
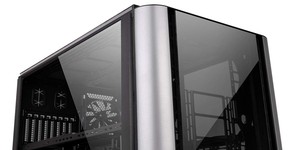
Interior
The acrylic panel is fixed with two primary screws, one at either end of the edging. However, it also has a reinforcement bracket over the curved corner, which means you need to release six screws in total. Sadly, we found it was initially very stiff to slide back and lift out, but eventually it worked and after that it was looser too. The other side panel uses two regular thumbscrews and is easier to work with.


Inside is pretty spacious, and the full-length motherboard tray supports E-ATX models. Most motherboard mounts are pre-installed, but the furthest right set you'll need to do yourself. There is no PSU cover, which isn't surprising since this is quite a flashy case clearly designed more for showcasing hardware than hiding it away. The PSU area itself has pads for the unit to rest on, but these are made of foam rather than the preferred rubber.

Quite a common feature these days is support for vertical GPU mounting, and again this is in line with the showcase nature of this chassis. You don't get the necessary riser cable (it just adds cost for those who don't want it), but Thermaltake does at least include the metal bracket. This will get in the way of installing expansion cards lower down the board, but primary GPUs are not impeded.

In the bottom-front corner is a three-bay HDD cage. Each bay is filled with a plastic tray with squeeze-to-release clips and a tool-free locking mechanism, although all drives, be they 3.5” or 2.5” models, will need screws to be installed in these. Note that there is no rubber built in to help with keeping vibrations down. As you might have noticed, there are rails atop the HDD cage, which allows you to stack cages and then secure them to the elongated motherboard tray.

That said, we find it hard to believe anyone would need to add an extra cage to this case, as behind the motherboard tray there is room for a further four 3.5” drives or eight 2.5” drives (or a mixed combination) thanks to a quartet of removable trays, each held in place with just a single thumbscrew for ease of use.

A large hole by the PSU and six smaller ones that run up the middle of the motherboard tray (catering to ATX and E-ATX motherboards) equip the View 37 RGB for cable routing. These are all guarded by rubber grommets, while a couple of smaller cutouts along the top are not. The holes definitely help a lot, and there's a good amount of space between the side panel and tray too, but Thermaltake is a bit stingy in its supply of zip ties, and you don't get any reusable or Velcro ones. We didn't have much issue tidying our rig, but we could see it becoming tougher to work with if that back area started to fill up with drives.

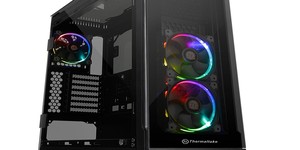
Speaking of cables, you'll also need to accommodate the fan controller, and this isn't really optional since the bundled fans use USB-style headers that plug into the controller rather than regular three- or four-pin fan headers. Still, these fans and the controller are the main reason you'd buy this case and not the non-RGB one, so it's understandable. Velcro pads allow you to stick the controller anywhere there's room. As well as connecting the three fans, the controller also takes a SATA power connection and connects to your motherboard via a PWM cable. It has buttons to control fan speed, light mode, colour mode, and light speed, but since it will almost certainly be inside your chassis, these aren't exactly easy to access. Thermaltake's solution is another cable, this time connecting to a PCI bracket that has those same buttons on for external access. You can even connect it to supported Gigabyte, Asus, and MSI motherboards, this time to the RGB header to utilise their respective RGB software control suites. Finally, extra controllers, fans, and LED strips can be daisy-chained, but you'll need to purchase these separately.


All told, you'll end up with quite a lot of additional cabling to deal with, especially as the wires tend to be on the long side too. It isn't a particularly elegant solution, and even the PCI bracket controls could hardly be called practical. Obviously you get more flexibility than you would with a fixed, integrated solution, though. Fans are synchronised via this controller, and with it you can set seven different lighting modes, a variety of single colours, and four different lighting speeds. Actual fan speed is limited to high and low.
For water-cooling, the front of the case is the focus. Radiators that are 240mm and perhaps 280mm in size should fit above the HDD cage without issue, but for 360mm and 420mm models you will need to remove it. You don't get dedicated pump or reservoir brackets, but the elongated mounting holes along the floor of the case should suffice for this. One alternative is to have a radiator that faces the clear acrylic side, which lets you better show off your fans and probably has better airflow too thanks to the side vents.
RELATED ARTICLES


MSI MPG Velox 100R Chassis Review
October 14 2021 | 15:04


Want to comment? Please log in.