How To Make A Lego USB Drive
A Lego USB drive is one of the most obvious and desirable geek desk toys, if only because it means you can keep your files in a convenient and literal stack. There are some official versions available for purchase, but we think it’s a bit more fun to make your own. It’s not exactly complicated and won’t cost you very much either.Besides, if (like us) the bulk of your Lego collection has since been donated to younger relatives and you’ve only got one or two bricks left, this is the perfect way to make use of those errant oblongs.
There are a few ways to tackle this project, the simplest of which involves just building an enclosure of Lego bricks around your USB drive and leaving it at that. There’s nothing wrong with that approach, but the end result will definitely be a bit chunky and crude. Thankfully, we’ve got a more eloquent solution.
The first thing you’ll need will be a spare USB drive. We say ‘spare’ because, while Flash drives are quite rugged and resistant to injury, there’s always the possibility of damage. Back up your files on a separate device before you do anything else, just in case.
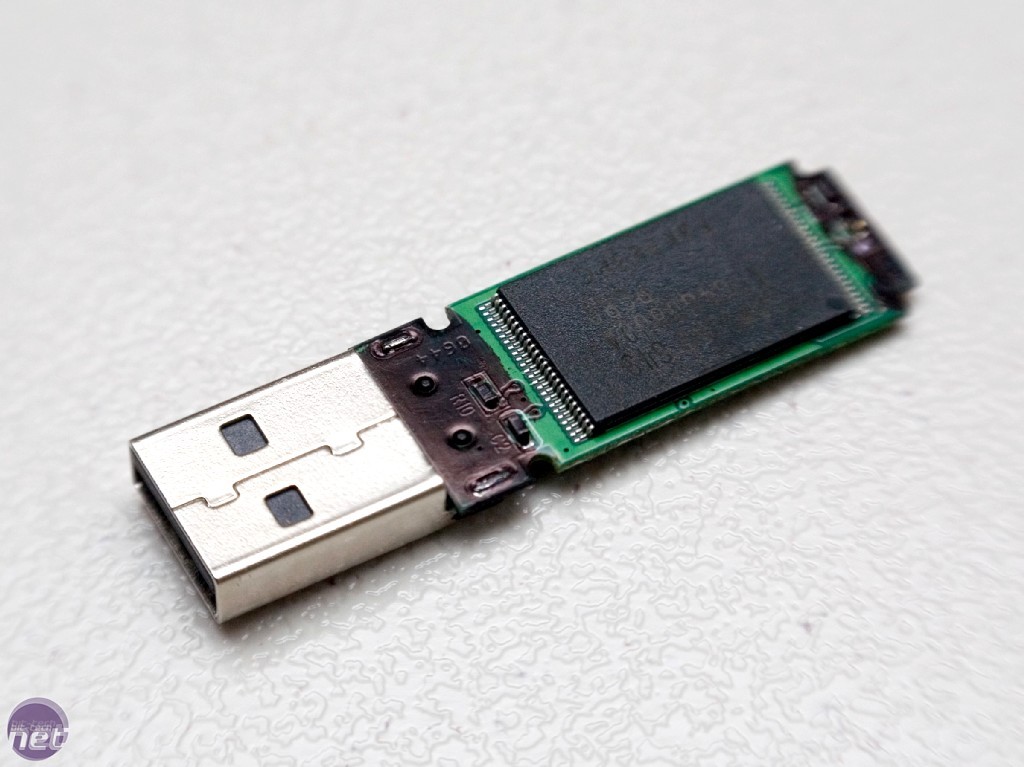
Take the casing off the USB drive, revealing the PCB
That done, you’ll need to remove the PCB and male port (i.e. the actual USB drive itself) from whatever protective case it is currently housed in without damaging the drive within. If you’re buying a drive just for this purpose then we’d recommend the ATP Earthdrive as we know the case can be prized apart easily. Plus, the casing will biodegrade safely, leaving your inner environmentalist guilt-free.
Next, choose your bricks. If you’re using the ATP Earthdrive or a similarly stubby USB drive then you’ll only need a single 2x3 brick, but longer drives will need to be fitted inside larger bricks. Thankfully, Lego bricks come in all shapes and sizes so, not only will you be able to find a match easily enough, but you’ll also be able to customise the brick however you want. One of the more complex approaches is to use a stack of Lego panels, rather than a single brick, to create a layered appearance.
Whichever brick you settle on, you’ll need to hollow it out to make room for the USB PCB. The low-tech approach is to just gouge the innards out with some needle nose pliers and a decent craft knife, but you could also cut them out with a Dremel. If you do use a Dremel then don’t let your cutting edge heat up too much as this may mar the brick – give it time to cool. Lego bricks are made out of a thermoplastic called acrylonitrile butadiene styrene (ABS) which, while tough, isn’t too hard to work with given a bit of perserverance.

However you hollow the brick out, you’ll also need to open one end so that the male port of the USB can stick out. Again, it’s hard to give exact measurements as it’ll depend on exactly what type of USB stick you are using and if the male connection has a metal casing around it. The safe approach is to just cut one end off the brick completely, then sand all cut surfaces smooth.
If you want, then you can use a small drill to put two small holes in the opposite end, allowing you to thread a lanyard connector in, so you can attach the brick to your keyring.
The final step is to cement the USB drive within the block using some epoxy resin. We know from our similar Project Enter the USB mini-mod that E6000 epoxy resin will do the job without damaging the PCB, but other sources suggest that a hot glue gun will work just as well. Just add a dab or two of the epoxy into the brick, push the PCB in and proceed to encase the PCB in stages, allowing one layer to dry before you add another. This layered approach will provide a solid, secure fit for your finished Lego USB key which, once the resin has dried, will provide a stylish addition to any PC!
RELATED ARTICLES


MSI MPG Velox 100R Chassis Review
October 14 2021 | 15:04

Want to comment? Please log in.