
Let's blow this joint!
Once we have all that gorgeously colourful, perfectly cut acrylic, it's time to look at how we're going to join pieces together. Whether you need to make a whole case or just a few parts, odds are that you're going to need to put more than one piece together.With that in mind, let's take a look at how we tend to put things together:
- Glue
- Fasteners, or
- Fancy cuts (dovetail, biscuit).
But hey, let's be honest – we're not trying to weave the next Sangaku with acrylic. We could, but it would probably be a poor imitation and take flipping forever to build. And we're smarter than that, right? We'll pretend, at least...
So, though we may not be flooding the forums with fancy dovetail or mortise and tenon joints, let's take a look at the gluing and screwing that we're actually likely to do.
Gluing
Ah, now here is where acrylic can truly come into its own. No other material, and I mean no other material, is capable of truly fusing two pieces together and have them look as if it was one solid piece. This is an honour only given to acrylic, and only capable by practice, practice and practice. So before you go throwing out all those handy scrap pieces, why don't we work on them a bit, eh?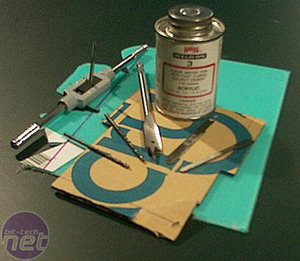 First, let's talk about what glues acrylic together. Few people know this, but superglue is actually one of the most potent bonding agents available for acrylic. I mean to tell you, this stuff works wonders. Slap it between two pieces put them together within a couple seconds and BAM! It's over, folks. It'll take a hammer to separate them.
 Unfortunately, super-glue welds look like, well, crap. Sure, there's points where you can get away with them – if you're using all opaque pieces, for instance, it's silly to NOT use superglue. Nobody is going to see between the two pieces!
However, if you have a little more sightly weld or transparent pieces, you may wish to go for a slightly different technique. That's where the wonderful IPS Weld-On comes in. Weld-on is made of di- and tri-chloromethane compounds, which literally "unmake" the polymer for seconds at a time. As these compounds evaporate, the polymers re-adhere almost as if cell cast again. The joint becomes as if the piece were perfectly bent.
Oddly, that's rarely how it comes out looking. In normal practice with acrylic, people take two edges at ninety degrees, sandwich them together, and slap some IPS Weld on it. Then, they wonder why the joint is so clearly visible, when they read about acrylic being able to become seamless.
The reason is mostly in the angles because that edge that's still exposed was cut (roughly), meaning it's going to be hard to polish it away—at least not without some help. On top of that, no matter how close you think you are to perfectly levelled, odds are that you're not. But if you mitre the edges to each be 45 degrees through use of your handy table saw, you'll end up with a nearly invisible edge.
As a side note, here's a tip from Bill (one of the guys behind C3 cases) - extruded acrylic tends to glue better than cast acrylic. However, due to how its made, the thickness may actually vary a bit from one end of the sheet to the other, producing a slightly wavy edge. Just another one of those handy tips from the pros, that I didn't know either!
Screwing
We've covered the gluing, now how about the screwing? Yep, that's right, fasteners (in the case of acrylic, almost always screws) are the next biggest method of joining acrylic. And why not? They're cheap, readily available, and can look the business if you've got the right type of screws to go with your mod.Screwing acrylic together is pretty easy, but you'd be surprised at how many modders manage to only screw the pooch. The devil is in the details, as they say. More often than not I see people slap a screw in, only to see spiderwebs in (or even a chunk come off of) their carefully laser-cut piece. What happened?
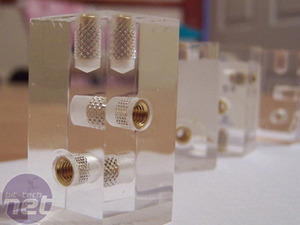
Phinix Cube used acrylic cubes, with screw holes
that were lined with brass inserts.
Then, please make sure to use a tapping kit! If you don't have one, they can be had from your local hardware store for not that much – or, look at ordering one online. Cheap taps are cheap, and they'll do the work you bought them for – likely saving you the cost of a bunch of new acrylic, which is far more expensive. If you go an expensive route, I'll assume you're using them for metal work as well – they do serve multiple purposes, after all.
If you don't want to tap, there's another idea that I picked up from our February Mod of the Month competition – take a soldering iron and heat up brass inserts to fit into the holes. It will look like a professional job for a cost of next to nothing. The heat helps the brass insert fit in by softening the acrylic around it, which then cools to grip it tightly. This way, the insert is held fast so it doesn't slide out as you insert the screw, and help insure a tight fit without cracking the acrylic. Thanks for the great tip, Phinix!
As for where to screw (all jokes aside), try not to look at the edges where the "grain" is likely to run. Instead, look at using small cubes that you can build from your scrap (or buy a piece of extruded square rod – for this, it's ok). Screw a cube into each corner and you're all set! You can even weld the pieces together with IPS Weld-On and then screw them together – just for that long-lasting, survive an apocalypse feel.
RELATED ARTICLES


MSI MPG Velox 100R Chassis Review
October 14 2021 | 15:04

Want to comment? Please log in.