
Making it shine
Yeah, yeah, we mod because we love it… Of course we do. It's not because we like to show off our work – right? Ahem...nope, we're not at all interested in making it gorgeous so that we and those around us can drool over our accomplishments!Riiiiiiight...
A good mod is little if it's not seen by anyone – even when we build it for all the right reasons. And in order to display our new acrylic babies to the world, well – we have to wipe the gunk off of them first.
And that brings us to the next major step in acrylic – we've cut it, we've joined it, and now we need to light it up. So, let's get to it, shall we?
Lighting
Acrylic can be lit several different ways, but the de facto standard nowadays is with embedded LED work. Granted, this is no way a black-and-white scenario – UV cold cathodes often still provide "flood"-style lighting in a case, making the UV-reactive acrylic glow like a Christmas tree.The nice thing is, this is an easy way to make your acrylic work "pop." However, it has the drawback of looking like a 1980's teenager bedroom. Don't get me wrong, I see a lot of very nice UV effects – but more often than not, they just end up looking a bit over the top.
Subtle and diffuse backlighting and clear, visible point lighting from coloured LEDs offer a nice alternative, and both of these really shine when held fast in acrylic panels. But before we get to that, we should probably cover how to get both of these effects – and that revolves a lot around how you polish your finished work.
Polishing your jewels
How do you get acrylic edges to look smooth as glass? Here's a tip – leave the sander at home. No, seriously.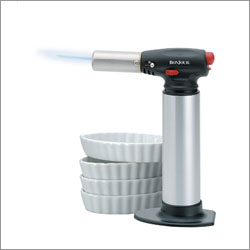
Once you're done making dessert,
use it for your modding!
Once your bonds are completely dry, you wet both the surface to be sanded and the sandpaper, and use a soft foam or rubber block to apply very even pressure. A little soap in the water will help the lubrication. The material is then sanded with very light pressure, in order to even things out. Easy, huh?
Here's a tip – leave the water and the sanding blocks to your next attempts at spray paint. For this round, we're going medieval on it – it's time to bust out the blowtorch (we can leave the pliers out of it).
Yep, I said blowtorch. It doesn't matter what kind – whether you have a Crème brûlée torch in the kitchen or a good old Bernz-O-Matic for sweating pipes, it'll work great. Go on, light that bad-boy up. Got it? Goooooooood... Now, wave it quickly over the edge to be finished – and there you are, a perfectly glass-like edge! If you're fast enough, you should be able to make almost any edge look like a professional job – remember to feather it into the other piece if you didn't read the last page and cut that 45 degree mitre!
For scratches on the actual panel, flame polish might get a little more risky. For that, take some metal polishing compound and give it a go – it should fix most scratches that aren't too deep.
Rubbing it raw
We've covered how to get things polished to a spit-shine, but what if you wanted the opposite to be true? Maybe you weren't looking for transparency from your project, and instead wanted a bit of translucency instead. Well, don't worry; we have that covered, too.Go grab your nearest palm-sander and slap some fairly rough-grit sandpaper on there. No, not the P50 stuff – more like P120 or so. Apply liberally to both sides of the sheet of acrylic, if available. There you are – a nicely translucent panel.
Why both sides? Because people tend to move in rhythms and patterns, whether they mean to or not. By doing both sides of the acrylic, you're sure to create a fairly random distribution that will equal out to create an even spectrum of light. You can use this finish on nearly anything, but a couple great ideas include creating a vandal-resistant switch lookalike or a very diffusely lit motherboard tray. Of course, feel free to add your own ideas!
As you can gather, using this type of technique will create a very even spread of light due to diffraction for any light source behind or inside the panel. So, let's take a look at that finally....
Turning the lights on
If you're looking to mount LEDs to make acrylic light up brilliantly, look no further than your drill. Are you wondering if you read that right? Yep, I did say drill – because lighting up acrylic happens best when the light is inside the panel itself.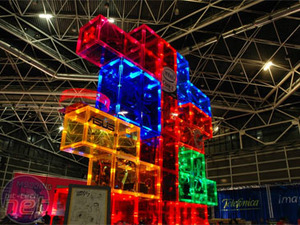
The Tetris Mod by Planet Express Klann
features LEDs embedded in the edges of each piece.
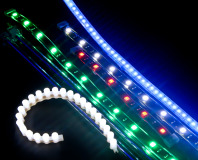
When light is behind these fibres, it has to shine through them, which involves a small amount of refraction and reflection, but very little retention. However, light that is passed across the fibres, from one end to the other, makes every edge light up like a headlamp – almost as if it was glowing itself.
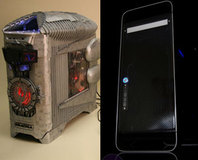
This technique is what gives many great mods like Orac their gorgeous lighting – the LEDs get mounted straight into the acrylic, and the whole sheet of plexi lights up around the edges. The same technique can be applied to whole panels if they're sanded, creating a diffuse, uniform light.
So how do you get the LEDs in there? That's where the drill comes in – simply drill a 5mm or 3mm diameter hole, insert a little hot glue, and push it in there. If you hide the edge where the LEDs are mounted, the light will spread to any edges of the panel as well as any screw holes, fan holes or other cuts or breaks in the plexi, illuminating them as if by magic.
This technique's been around since modding began practically, but I've still only seen it used for engravings and accent lights – the idea has a lot more applications that have still been ignored.
RELATED ARTICLES


MSI MPG Velox 100R Chassis Review
October 14 2021 | 15:04

Want to comment? Please log in.