
With Side A (the 'open' side of the case) complete, attention turned to Side B, which fortunately came together quite quickly. The phrase 'Do you know the true meaning of F.E.A.R.?' was a theme right from the very beginning of the project, and Vivendi provided a very high resolution version of the military squad squatting in position, ready to attack.
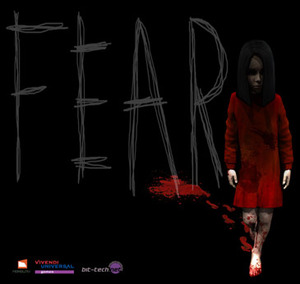
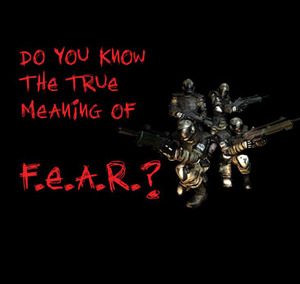
Here are the two side panel artworks...
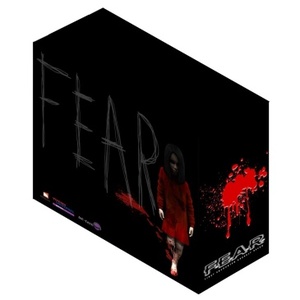
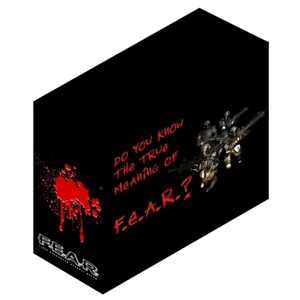
...and these are 3D mock-ups of the final case, made very simply in Photoshop by using the Distort tool and nudging each 2D square into perspective to create the illusion of depth.
With the design approved by the game's Product Manager, I set about creating the required 300dpi files to sent to PolyGFX. For anyone who has worked with designs for print, this stage will be familiar, but for the majority of you who are only familiar with web-based graphics and game screenshots, the figures involved may come as a shock.
The first step was to slap as much RAM as I could find into my machine; with only three DIMM slots, this meant 3 x 512Mb for a total of 1.5Gb - my sincere thanks to the lads at Tweaktown for the loan, as my standard 768Mb was never going to be sufficient.
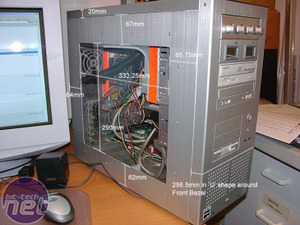
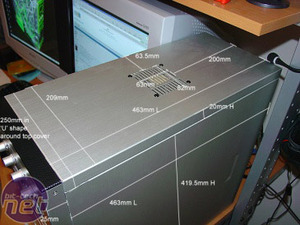
Next came measuring the case to the nearest millimetre to determine the exact dimensions of the CaseSkin. Luckily, I still had the measurements made by our own Pete 'Orac3' Dickison from an earlier project, which saved a lot of time.
Calculating the size of the Photoshop canvas is simple: take the width and height in inches, and multiply by the required DPI (dots per square inch), which in this case is 300. A quick conversion from millimetres to inches, and voila: 6,142 x 14,764 pixels!!! If you're wondering, that pixel area is the equivalent of over 86 megapixels and the resulting uncompressed TIFF file was 259Mb in size.
A few painfully slow hours later, and the artwork was complete. Luckily, WinZIP was able to stomp that file down to a mere 11Mb for uploading, and my skin was down the wire for PolyGFX to print.
Here are the two side panel artworks...
...and these are 3D mock-ups of the final case, made very simply in Photoshop by using the Distort tool and nudging each 2D square into perspective to create the illusion of depth.
With the design approved by the game's Product Manager, I set about creating the required 300dpi files to sent to PolyGFX. For anyone who has worked with designs for print, this stage will be familiar, but for the majority of you who are only familiar with web-based graphics and game screenshots, the figures involved may come as a shock.
The first step was to slap as much RAM as I could find into my machine; with only three DIMM slots, this meant 3 x 512Mb for a total of 1.5Gb - my sincere thanks to the lads at Tweaktown for the loan, as my standard 768Mb was never going to be sufficient.
Next came measuring the case to the nearest millimetre to determine the exact dimensions of the CaseSkin. Luckily, I still had the measurements made by our own Pete 'Orac3' Dickison from an earlier project, which saved a lot of time.
Calculating the size of the Photoshop canvas is simple: take the width and height in inches, and multiply by the required DPI (dots per square inch), which in this case is 300. A quick conversion from millimetres to inches, and voila: 6,142 x 14,764 pixels!!! If you're wondering, that pixel area is the equivalent of over 86 megapixels and the resulting uncompressed TIFF file was 259Mb in size.
A few painfully slow hours later, and the artwork was complete. Luckily, WinZIP was able to stomp that file down to a mere 11Mb for uploading, and my skin was down the wire for PolyGFX to print.
RELATED ARTICLES


MSI MPG Velox 100R Chassis Review
October 14 2021 | 15:04

Want to comment? Please log in.