Layout
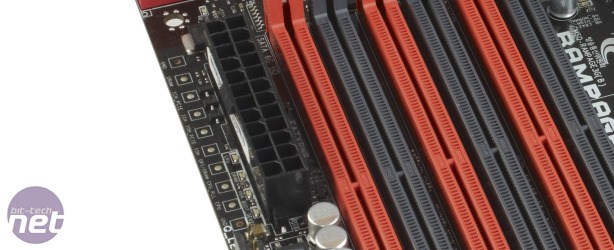
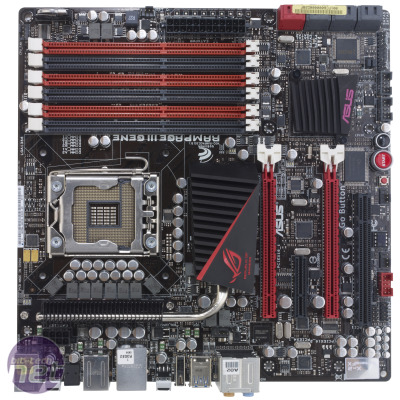
Overall, the layout of the board is excellent, especially given that Asus has crammed in a full six DRAM slots and chunky VRM and chipset cooling. The 24-pin ATX power socket is well located on the right-hand side of the board, and in a change from the Rampage II Gene, the IDE port that sat next to this power connector has been removed. The space freed up by this change has been filled by the Asus ProbeIt contacts (which always seems to read as 'Pro Belt'), which allow you to use a multimeter to get exact voltage readings. It’s not a killer feature, as few people are likely to be pushing the board so hard that they need ultra-accurate voltage readouts, but they're arguably more useful than an IDE port.Moving down the board, it's good to see all eight internal SATA ports mounted parallel to the motherboard. This arrangement makes for neater cabling, which makes your computer look better and potentially run cooler. The board also has Start (power) and Reset buttons on its lower edge, again, useful additions if you’re running the board on a test bench.
However, we're starting to see boards that place these handy buttons near the 24-pin ATX connector. This make them easy to use when the motherboard is installed in a case, as well as on a test bench (as there's no expansion card to get in the way), which is brilliant should you hit stability trouble down the line.
One area where Asus hasn’t made any changes is in the arrangement of expansion slots. The R3G accommodates the same pair of 16x PCI-E slots as its predecessor, which are both capable of running with a full 16 lanes of bandwidth if you have the money to burn on two graphics cards.
In between the two 16x slots is an open-ended 4x PCI-E slot. This is a sensible choice for a small board with limited space as it means you can fit any PCI-E card in this slot. You could even put a full-length graphics card in there if you wanted; this wouldn’t be much good for gaming with, but it could still power another 2-3 screens or run a Folding@home client and return some ppd.
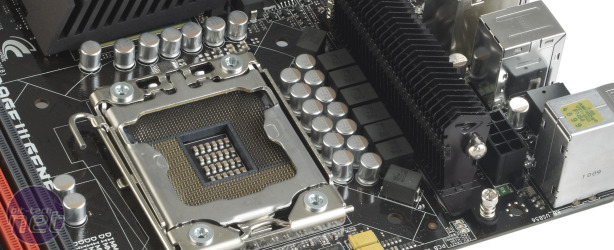
The R3G's power circuitry is largely unchanged from that of its predecessor, with an 8-phase design supplying the CPU and two phases for both the Northbridge and the memory. This is a robust design and while it may not be as ostentatious as the power circuitry on full-size RoG boards, it was completely stable through all our testing and overclocking.
The back panel features a solid array of ports, with six USB 2 and 2 USB 3 ports, a network port and a FireWire port. It's also got a unusual sideways-mounted USB port, but this is exclusively for use with the RoG Connect technology, which allows you to overclock the motherboard via a laptop. This is of limited appeal, but talking about it in the pub is a sure-fire way to make yourself look awesome. Or possibly not.
Overclocking
The R3G proved a willing overclocker, with a well organised BIOS. All the options needed are grouped together in a single section which saves time, and the target CPU and DRAM frequencies are updated on the fly so you can see exactly what's going on. Some minor options, such as memory timings, are hidden away in sub menus but these are easy to access and prevent the options page from getting too long. Voltages can be typed in directly, which is always a good thing, and the current setting is displayed next to the new setting for easy comparison. Voltages are also colour-coded to give a simple visual clue as to how close to melting your CPU you are.After a little tinkering, which was a wholly pleasant experience, we succeeded in getting our chip to its air-cooled maximum of 4.4GHz via a QPI of 200MHz and a multiplier of 22x. This required a vcore of 1.381V, a QPI/VTT of 1.375V, a CPU PLL of 1.96V and bumping both the Northbridge and the Southbridge to 1.3V.

The VRM circuitry only includes eight phases, but it flew through our tests without any problems. Click to enlarge
We also took some time to find the maximum QPI the board would run, as this is useful information for extreme overclockers and a good test of the overall quality of a motherboard too. The R3G was happy to run with a QPI of 220MHz, which appears to be the limit of the X58 chipset on air, as we've not seen a board achieve a result above this. A QPI of 200MHz should be more than enough head-room for any LGA 1366 chip though, unless you’re using LN2 or other exotic materials.
It's worth noting that the board also recovered from failed overclocks elegantly, returning us to the BIOS to work out what we'd pushed too far.

MSI MPG Velox 100R Chassis Review
October 14 2021 | 15:04


Want to comment? Please log in.