BaDassumption Part 1

May 8, 2007 | 07:59

Tags: #bad #badassumption #build #cars #case #cedar #dutch #dutchcedar #job #paint #scratch

Companies: #mod

The Pump and Outriggers

BaDassumption Part 1 Chrome plus Water equals...

The design for the front outriggers was inspired by a Mustang short shifter bought on eBay. A drawing was made up for them and sent to Billet Machine, who did a gorgeous job of water-cutting them from 1/2" thick aluminium. They came back about a week later, along with some other brackets.

The pump is a chromed version of the famous D4 pump, the TT made by PolarFLO with a custom machined aluminium cover made just for this project by Billet Machine. I have a newer version, the D5, and am hoping the internals will be a straight forward swap. Laying out the pump arrangement was a little tough - there is a tight route that the plumbing will have to take with this pump, so I used a PolarFLO chipset cooling block to make a full 180 degree turn for the coolant. It involved making a special bracket that was cut with the router and band saw.

BaDassumption Part 1 Chrome plus Water equals... BaDassumption Part 1 Chrome plus Water equals...
An awful lot of figuring and fumbling went on to get the whole pump arrangement to work right, but in the end, even though it consisted of a pretty wild set of parts, it seems to work pretty well. It even has a nerf bar made from a radio control car chassis brace.

BaDassumption Part 1 Chrome plus Water equals... BaDassumption Part 1 Chrome plus Water equals...
To get the plumbing through the front of the case, a pair of custom fittings were made up and a pair of 1/8" thick anodized aluminium scrap pieces were cut to shape. The fittings were eventually cut down and fitted with DangerDen high flow barbs.

BaDassumption Part 1 Chrome plus Water equals... BaDassumption Part 1 Chrome plus Water equals...

Folding Coolant Lines

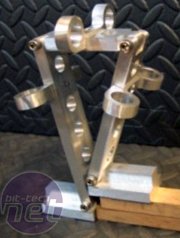
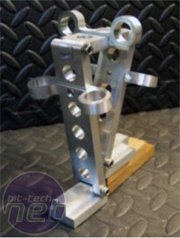
This idea was inspired by Eddie "scopEDog" Saavedra, and because I had finally broke down and bought a small milling machine after spending a good year on this project, it was a perfect opportunity to try to make something that was a bit more challenging. The idea? Making the coolant lines unfold when the motherboard tray gets pulled out, so that the rig can remain running even when its completely opened for service.
BaDassumption Part 1 Chrome plus Water equals... BaDassumption Part 1 Chrome plus Water equals... BaDassumption Part 1 Chrome plus Water equals...
BaDassumption Part 1 Chrome plus Water equals...
It started like this - a few tubing guides set into three aluminium flat bars that have pins for pivot points. After the bars were drilled and fit to end blocks, they looked kind of strange. Once unfolded, though... well, they still look strange.

BaDassumption Part 1 Chrome plus Water equals... BaDassumption Part 1 Chrome plus Water equals...
A plate was added to the trailing end of the motherboard tray, and more hose guides were fit to the plate. Once it is inside the case, the entire assembly ends up looking like this.
Discuss this in the forums
YouTube logo
MSI MPG Velox 100R Chassis Review

October 14 2021 | 15:04