
Get your mind into the sewer. Sewer pipe that is. Based on the dimensions of the components going into the system, I needed a case height of 6". I knew I wanted a "tablet" shaped case with rounded sides so I went out and found something with the shape I wanted to create a form to bend my acrylic panels onto. It turned out to be 6" OD PVC pipe, primary purpose, sewer pipe. In my best Lister from Red Dwarf voice "It's all clean, it's been sterilized, it's clean" to which you would answer as the cat "This isn't a mod project, it's an autopsy". Actually it's brand new for the record.
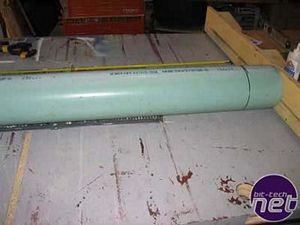
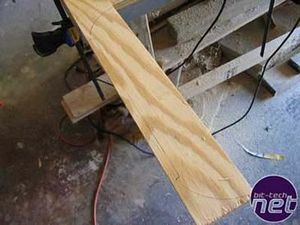
Here is our first patient. Putting it on the slab, I cut it to a manageable length using the table saw, which turned out not the best way but it worked.
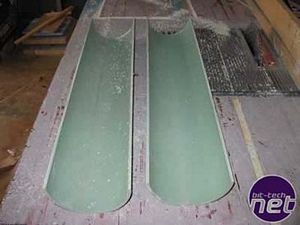
Then I ripped the pipe right down the middle baby.
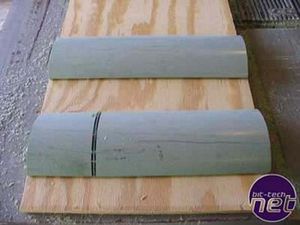
Then I ripped those sections and got the best matching pair (keep in mind that each pass with the saw blade thanklessly consumes 1/8").
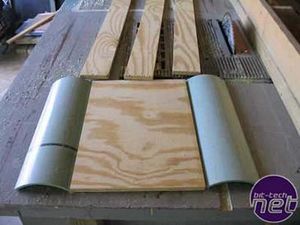
Then I got a sheet of cheap plywood to create the shell and framework for my form. I ripped three pieces for the structure and a panel to act as the top.
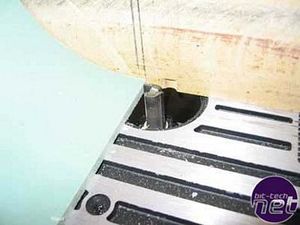
Next, using my router in my router table, I set the flute bit for the exact depth of the thickness of the walls of the PVC pipe. Then I used the bit to cut a ledge on the panel of plywood that will be on the top of the form and when merged with the PVC pieces, they will be flush.
Once I had my "shell" shape, I traced it on the braces and cut out using my jig saw.
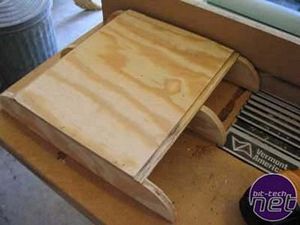
Then just used the pneumatic brad nailer to quickly pin it all together. Here you can see the ledge on the edge of the top panel that was created with the router.
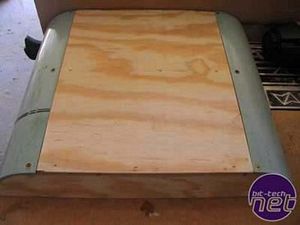
With the structure together, I can now mount my PVC to create the rounded ends. I used regular wood screws and countersunk them in the PVC to allow a flush surface.
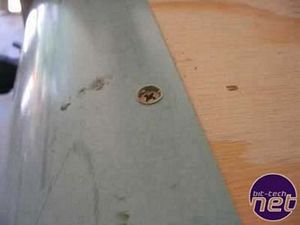
A closer look at the screw mounts and where the PVC meets the wood, pretty close, but not close enough.
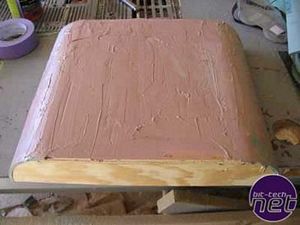
Bring on the bondo. To promote a really good forming of the acrylic, I covered the entire thing with bondo body filler. Yes it's messy, this was my first time using this stuff and they give you a plastic squeegee the size of your thumb to apply it. Smart money is on getting a bigger one next time I try something like this. It's no real big deal, I'm going to sand it down anyway, but the better you apply it, the less sanding you need to do. The bondo helps level the slight ledge where the PVC meets the plywood and does an excellent job of filling in the countersunk screw holes.
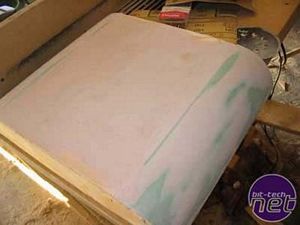
After a good sanding down, the surface is smooth, consistent, and the colors remind me of the 80's and Miami Vice (Crocket get down, it's going to blow!!!).
Here is our first patient. Putting it on the slab, I cut it to a manageable length using the table saw, which turned out not the best way but it worked.
Then I ripped the pipe right down the middle baby.
Then I ripped those sections and got the best matching pair (keep in mind that each pass with the saw blade thanklessly consumes 1/8").
Then I got a sheet of cheap plywood to create the shell and framework for my form. I ripped three pieces for the structure and a panel to act as the top.
Next, using my router in my router table, I set the flute bit for the exact depth of the thickness of the walls of the PVC pipe. Then I used the bit to cut a ledge on the panel of plywood that will be on the top of the form and when merged with the PVC pieces, they will be flush.
Once I had my "shell" shape, I traced it on the braces and cut out using my jig saw.
Then just used the pneumatic brad nailer to quickly pin it all together. Here you can see the ledge on the edge of the top panel that was created with the router.
With the structure together, I can now mount my PVC to create the rounded ends. I used regular wood screws and countersunk them in the PVC to allow a flush surface.
A closer look at the screw mounts and where the PVC meets the wood, pretty close, but not close enough.
Bring on the bondo. To promote a really good forming of the acrylic, I covered the entire thing with bondo body filler. Yes it's messy, this was my first time using this stuff and they give you a plastic squeegee the size of your thumb to apply it. Smart money is on getting a bigger one next time I try something like this. It's no real big deal, I'm going to sand it down anyway, but the better you apply it, the less sanding you need to do. The bondo helps level the slight ledge where the PVC meets the plywood and does an excellent job of filling in the countersunk screw holes.
After a good sanding down, the surface is smooth, consistent, and the colors remind me of the 80's and Miami Vice (Crocket get down, it's going to blow!!!).
RELATED ARTICLES


MSI MPG Velox 100R Chassis Review
October 14 2021 | 15:04

Want to comment? Please log in.