
With the radiator out of the way now it was time to move on to the back of the truck and the motherboard mounting. First I needed to start removing a bit of the rear section, so that we can get a good idea of how things can fit.
.jpg)
We are going to have to lose a fair amount of the rear in order for the motherboard mounts and other things to fit properly. Oh well - I guessed there would be no turning back now, no matter what.
.jpg)
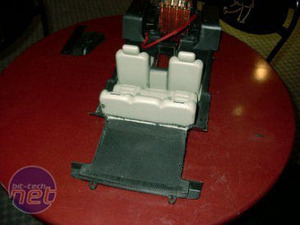
All gone - need a tray for the motherboard and all the good stuff.
.jpg)
Here is what we will start with. This tray assembly was donated from some poor case that also gave up it's power supply for this project.
.jpg)
We start by marking the minimum that we can cut. This is the size of the actual motherboard compared to the panel so anything on the outside of the marks is gone.
.jpg)
Here is the result of a bunch of cut off disks and a whole lot of sparks!
Remember safety. Always wear the proper gloves and goggles when doing this!
.jpg)
OK, here is my really scientific way of measuring! Yes, those are CD cases - but they did the trick.
.jpg)
OK, now to get a little help. I measured the distances to get the right spacing between the motherboard, the top of the Hummer and the rest of the parts. We have to make sure we can fit a video card in here with the body on.
This project, as with all good mod-jobs, is about taking your time and not only double checking, but triple checking as well.
RELATED ARTICLES


MSI MPG Velox 100R Chassis Review
October 14 2021 | 15:04

Want to comment? Please log in.