
20 LED versions
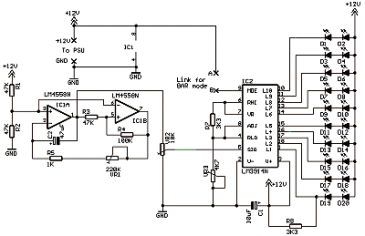
This version of the circuit uses 20 LEDs to produce the effect of two LEDs continuously moving towards each other, meeting and then moving away from each other in a line. Linking points "A" and "B" switches the display into "BAR" mode which changes the effect into a continuously"growing and shrinking" line of LEDs. The only difference between this circuit and the previous ones are the number of LEDs used.
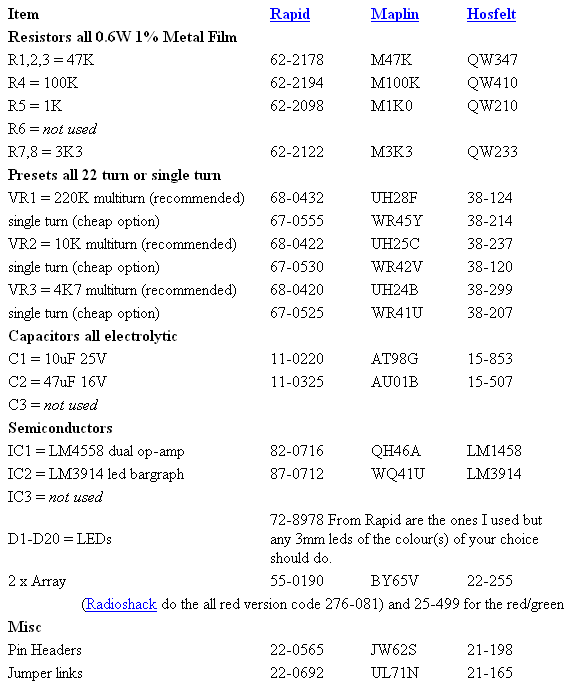
Parts List with order codes for UK and US suppliers
The PCB layout if using individual LEDs.
NOTE: there are two links on this board layout. R3 has two possible positions, use the lower position as shown.
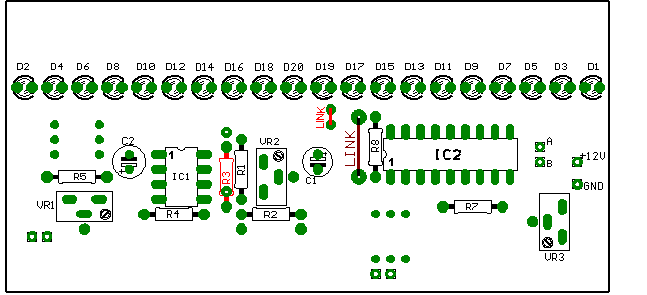
Component layout - top view.
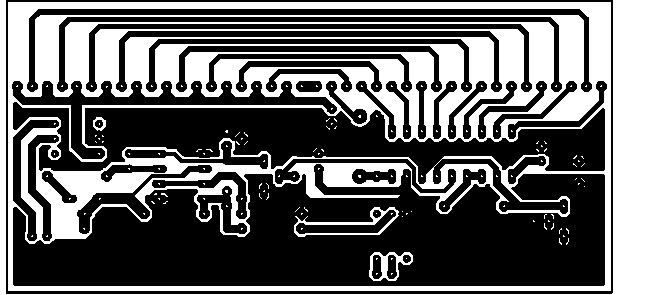
Track layout - Viewed from above.
The easiest way to bend the LED legs to fit the circuit board is to first butt the base of the LED up to the edge of the PCB, note which way the LED is with the cathode towards the top of the picture. It is vitally important to have the LED this way round. Get it wrong and the LED will be reverse connected and won't work and you will have to do it again, of course you won't know that until you complete the board and come to test it!!!! So make doubly sure to get it right first time.


With the LED aligned, clamp it in place using a straight edge along the line of holes as shown, and bend the LED upwards. I used a bit of off cut circuit board as the straight edge.


This picture should explain it all. Prepare all 20 LEDs before assembling the circuit board.


A couple of pictures showing the LEDs being fitted. A bit of care will produce a professional looking display.

The finished board.
The PCB layout if using two 10 LED arrays
This board uses two 10 LED bargraphs to make up the display. 20 LED arrays are available but are not suitable for this design. This board layout has two links. Again R3 is fitted in the lower of it's two possible positions.
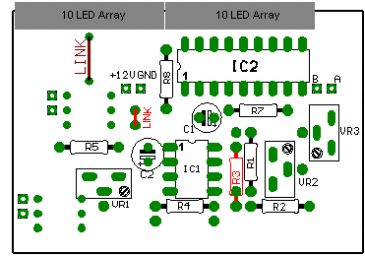
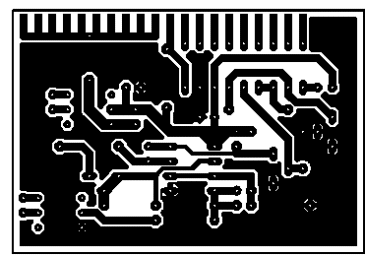
Component layout - top view (left) and Track layout - Viewed from above (right)


IMPORTANT - Notice that the left hand array, (as you look at the picture), is mounted as before in the single unit version by soldering the cathodes to the circuit board, BUT the right hand display is upside down and has it's anodes soldered to the board. The red and blue arrows indicate the bevelled edges denoting which row of pins are the anodes. Also take care to align the arrays accurately when soldering, this gives the finished display a "professional" look.

Each array LED is wired in series with it's opposite number in the other array. The picture above shows how the arrays are connected to each other.
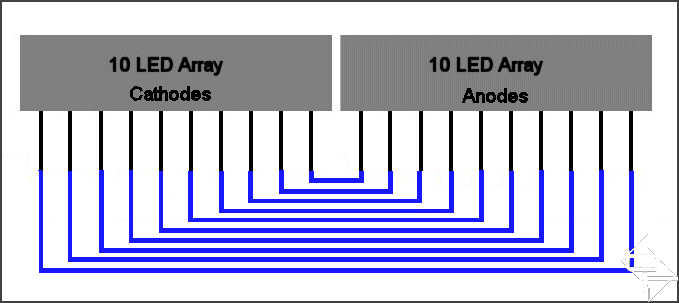
Wiring detail between the LED arrays viewed from above.
This version of the circuit uses 20 LEDs to produce the effect of two LEDs continuously moving towards each other, meeting and then moving away from each other in a line. Linking points "A" and "B" switches the display into "BAR" mode which changes the effect into a continuously"growing and shrinking" line of LEDs. The only difference between this circuit and the previous ones are the number of LEDs used.

Parts List with order codes for UK and US suppliers

The PCB layout if using individual LEDs.
NOTE: there are two links on this board layout. R3 has two possible positions, use the lower position as shown.

Component layout - top view.

Track layout - Viewed from above.
The easiest way to bend the LED legs to fit the circuit board is to first butt the base of the LED up to the edge of the PCB, note which way the LED is with the cathode towards the top of the picture. It is vitally important to have the LED this way round. Get it wrong and the LED will be reverse connected and won't work and you will have to do it again, of course you won't know that until you complete the board and come to test it!!!! So make doubly sure to get it right first time.


With the LED aligned, clamp it in place using a straight edge along the line of holes as shown, and bend the LED upwards. I used a bit of off cut circuit board as the straight edge.


This picture should explain it all. Prepare all 20 LEDs before assembling the circuit board.


A couple of pictures showing the LEDs being fitted. A bit of care will produce a professional looking display.

The finished board.
The PCB layout if using two 10 LED arrays
This board uses two 10 LED bargraphs to make up the display. 20 LED arrays are available but are not suitable for this design. This board layout has two links. Again R3 is fitted in the lower of it's two possible positions.


Component layout - top view (left) and Track layout - Viewed from above (right)


IMPORTANT - Notice that the left hand array, (as you look at the picture), is mounted as before in the single unit version by soldering the cathodes to the circuit board, BUT the right hand display is upside down and has it's anodes soldered to the board. The red and blue arrows indicate the bevelled edges denoting which row of pins are the anodes. Also take care to align the arrays accurately when soldering, this gives the finished display a "professional" look.

Each array LED is wired in series with it's opposite number in the other array. The picture above shows how the arrays are connected to each other.

Wiring detail between the LED arrays viewed from above.

MSI MPG Velox 100R Chassis Review
October 14 2021 | 15:04


Want to comment? Please log in.