The First Cut is the Deepest...
Time for some more cuttin\' action! It was time to tackle the motherboard itself...
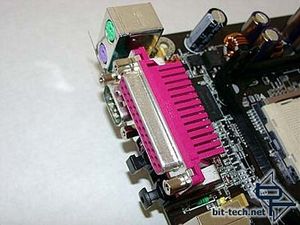
With a serial VFD and the mobo serial port being external I set about internalizing it. I had seen Mashie do this sort of thing before but at the time I couldn\'t remember exactly where, or what he did other than I remembered that it was possible - I really wanted a guide or something. As it was I took the plunge and had a go.
Cutting bits off your motherboard is probably not something that most modders attempt, especially when you have a rudimentary electronics knowledge as I do. At times I felt like a blind man where, instead of a white cane, I was waving a hefty pair of side-cutters! However, looking at the plugs I wanted to mod, it seemed a fairly logical process and not all that risky.
Breaking out my \'white cane\', I got busy...
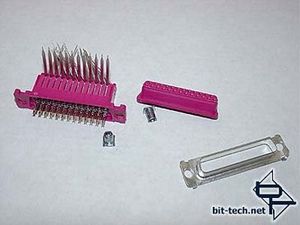
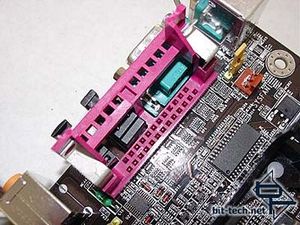
The first thing was to snip and lever off the parallel port to get at the serial port underneath. Half of it removed...
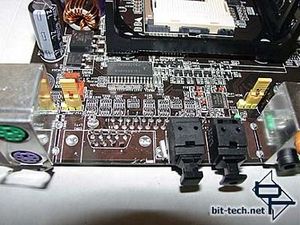
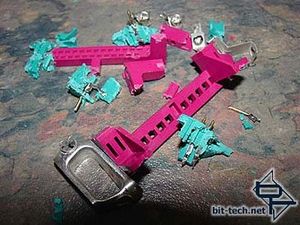
...and then the whole lot, plus serial socket. After side-cutters and pliers had done their thing - messy!
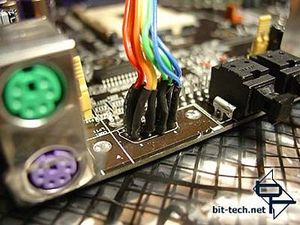
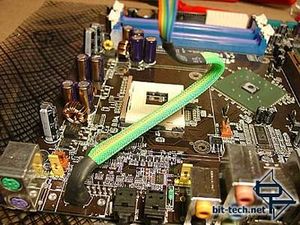
I soldered wires to each of the serial pins coming from the motherboard, added heat shrink and sleeved the lot with some Techflex braid. The free end is awaiting the addition of a 9 pin plug once I manage to get down to the electronics shop.
Now, the VFD actually only uses three of the pins in a serial connection to communicate to the motherboard, but with a replacement USB VFD standing by, courtesy of Henry at Matrix Orbital, I might need the port later to run other serial devices - hence wiring up every pin. I have to thank MO, and particularly Henry, for all their support with this project and for the latest model of their excellent VK-204-24 USB VFD. There isn\'t much this display can\'t do!
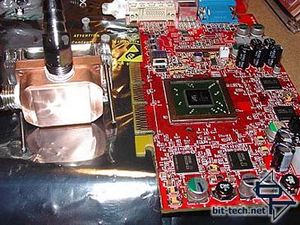
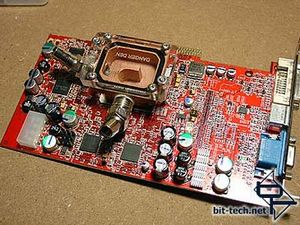
Also tackled was the mounting of all the water blocks on the motherboard and the video card. I removed the fan off the card (a Sapphire 9800pro) and cleaned the thermal grease off, added my own Arctic Silver, then mounted the block with the supplied fittings from DangerDen.
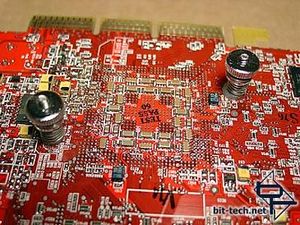
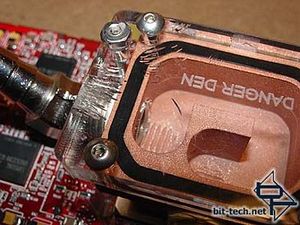
The mounting hardware comes through the back of the card - there being no room on the block side. It looks like some of the Isopropyl Alcohol I used to clean the card spilt on the lexan top of the water block - notice the telltale cracking. Bummer!
These cracks and the awkward size (3/8\") and angles of the barbs decided me to order one of the new Danger Den Maze4 GPU blocks. At the time of writing this article I have one sitting right here waiting for some attention....
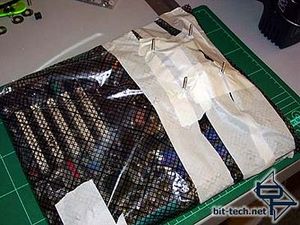
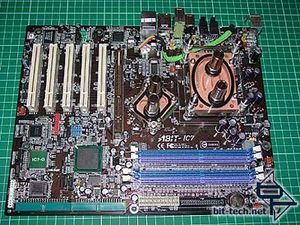
I mounted the main waterblock on the CPU and dremeled the excess off the threaded mounting rods. I covered the board with a plastic bag and taped around the areas I wanted to cut to prevent any metal particles from going where they shouldn\'t. With the blocks attached you can see the knurled brass nuts that I had chromed. Pity they won\'t be able to be seen...
The Chipset block fitted great with my custom mounting clips. Very secure and with identical tension to the original HSF thanks to being the same distance between the clips and the board\'s surface.
Time for some more cuttin\' action! It was time to tackle the motherboard itself...

With a serial VFD and the mobo serial port being external I set about internalizing it. I had seen Mashie do this sort of thing before but at the time I couldn\'t remember exactly where, or what he did other than I remembered that it was possible - I really wanted a guide or something. As it was I took the plunge and had a go.
Cutting bits off your motherboard is probably not something that most modders attempt, especially when you have a rudimentary electronics knowledge as I do. At times I felt like a blind man where, instead of a white cane, I was waving a hefty pair of side-cutters! However, looking at the plugs I wanted to mod, it seemed a fairly logical process and not all that risky.
Breaking out my \'white cane\', I got busy...


The first thing was to snip and lever off the parallel port to get at the serial port underneath. Half of it removed...


...and then the whole lot, plus serial socket. After side-cutters and pliers had done their thing - messy!


I soldered wires to each of the serial pins coming from the motherboard, added heat shrink and sleeved the lot with some Techflex braid. The free end is awaiting the addition of a 9 pin plug once I manage to get down to the electronics shop.
Now, the VFD actually only uses three of the pins in a serial connection to communicate to the motherboard, but with a replacement USB VFD standing by, courtesy of Henry at Matrix Orbital, I might need the port later to run other serial devices - hence wiring up every pin. I have to thank MO, and particularly Henry, for all their support with this project and for the latest model of their excellent VK-204-24 USB VFD. There isn\'t much this display can\'t do!


Also tackled was the mounting of all the water blocks on the motherboard and the video card. I removed the fan off the card (a Sapphire 9800pro) and cleaned the thermal grease off, added my own Arctic Silver, then mounted the block with the supplied fittings from DangerDen.


The mounting hardware comes through the back of the card - there being no room on the block side. It looks like some of the Isopropyl Alcohol I used to clean the card spilt on the lexan top of the water block - notice the telltale cracking. Bummer!
These cracks and the awkward size (3/8\") and angles of the barbs decided me to order one of the new Danger Den Maze4 GPU blocks. At the time of writing this article I have one sitting right here waiting for some attention....


I mounted the main waterblock on the CPU and dremeled the excess off the threaded mounting rods. I covered the board with a plastic bag and taped around the areas I wanted to cut to prevent any metal particles from going where they shouldn\'t. With the blocks attached you can see the knurled brass nuts that I had chromed. Pity they won\'t be able to be seen...
The Chipset block fitted great with my custom mounting clips. Very secure and with identical tension to the original HSF thanks to being the same distance between the clips and the board\'s surface.

MSI MPG Velox 100R Chassis Review
October 14 2021 | 15:04


Want to comment? Please log in.