Setting EAC up for the first time...
When you open EAC for the first time, you’re going to be greeted with a wizard, and everybody knows power-users don’t use wizards, so proceed to disdainfully cancel it. Pressing F9 will open up the EAC options menu (this can also be accessed from the EAC pull-down menu). You’re greeted with a menu with nine tabs, two of which you need to pay particular attention to for perfect rips while the remainder can be set up to your preference.Extraction: The only options you want selected here are “Fill up missing offset samples with silence”, “Synchronise between tracks” and “Lock drive tray during extraction”, with “Error recovery quality” set to high.Next we move onto the drive options menu, you can get to this by pressing F10 or selecting it in the EAC option menu. This is where we go overboard to some extent (in a good way) in ensuring the perfect rip every time, and you will be reminded of this by a pop-up window before you get into the menu. The options in these tabs aren’t especially verbose, and won’t necessarily make a great deal of sense.
Normalise: This should be un-ticked by default, but double check to make sure.
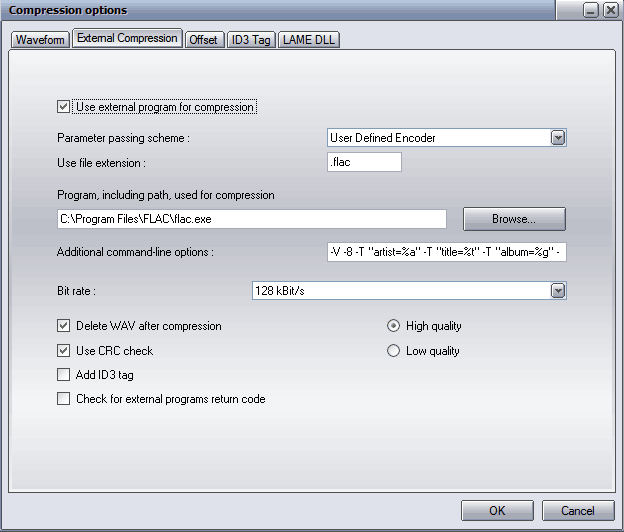
Extraction Method: You need to pop an audio CD in the drive when setting up these options. Click the “Detect Read Features” button to show the features your drive supports. Select “Secure mode” and tick the “Drive has ‘Accurate Stream’ feature” and “Drive caches audio data” options (provided these are supported by your drive).Last but far from least, we need to set up the FLAC encoder – press F11 or select “Compression options” from the EAC options menu. Set up the options in the “External Compression” tab as below.
Drive: Click the “Autodetect read command now” button and use whatever that selects.
Offset/Speed: This value varies from drive to drive, but fortunately there is a very comprehensive list of drives already prepared for you here. Select “Use read sample offset correction” and enter the value corresponding to your drive.
Gap Detection: The “Gap/Index retrieval method” doesn’t have an impact on the rip, but some options don’t work with certain drives. If you find that you have issues when detecting gaps, change this to another method. For “Detection accuracy”, you guessed it, select secure.

For the “Additional command-line options” you can copy this: -V -8 -T "artist=%a" -T "title=%t" -T "album=%g" -T "date=%y" -T "tracknumber=%n" -T "genre=%m" %s. This sets the encoder to verbose mode, selects a compression level of 8 and tags the music. Pay no attention to the 128 kBit/s bit-rate selected, this is not used and the audio will the same variable bit-rate regardless of what is selected here.
One final bit of setup, don’t worry, almost there, is to set up freedb options. Unless you’d like to type in all of the track names and various other details about the CD you’re ripping manually, you also need to add an email address to ”freedb / Database options” screen under the EAC options menu (F12).
You are now finally ready to rip a CD – rejoice! Press F4 to detect gaps, and then create a CUE sheet if you like. If you intend on using these rips for backup purposes, a CUE sheet is a good idea as it contains all of the information about the gaps between tracks, ensuring that a rip from the CUE sheet is identical to the original CD. Make sure that you select all of the tracks on the CD, assuming that you do indeed want to rip the entire CD, and then rip. Select “Test & Copy Selected Tracks” from the “Action” pull-down menu and then select “Compressed” (or just press Shift+F6). Now go get a cup of coffee or otherwise occupy yourself for a few minutes and then enjoy your perfectly lossless rip.
Depending on the type of music and how the music makes its way from your hard drive to your ears, you may or may not hear a difference between a well ripped MP3 and your lossless FLAC. I hesitate to say that you should be able to hear a difference if you have anything but the bottom of the range speakers/headphones or AC97 audio, but everyone’s ears are different.

MSI MPG Velox 100R Chassis Review
October 14 2021 | 15:04


Want to comment? Please log in.