
We are the Borg...
The next problem is potentially more serious, particularly in a passive cooling setup in which optimal efficiency counts. And that problem concerns the blocks.In order to cool the CPU and NB in this specific case, two blocks must be acquired: the Borg CPU Mini and the BorgFX bridge for the NB chipset. If you plan to fit a dedicated graphics card, the BorgFX VGA is necessary as well.
Both kits present as quite tidy, with all the bits and bobs required for mounting, including four heatpipes each, thermal paste, screwdriver and allen key, a little sheet detailing those bits and bobs and a manual. This is the "WOW" part of the kits...
The Borg CPU Mini and BorgFX bridge:


Click to enlarge.
...and here is the "WTF?" part. The Borg CPU Mini and the BorgFX bridge undersides (the black one):
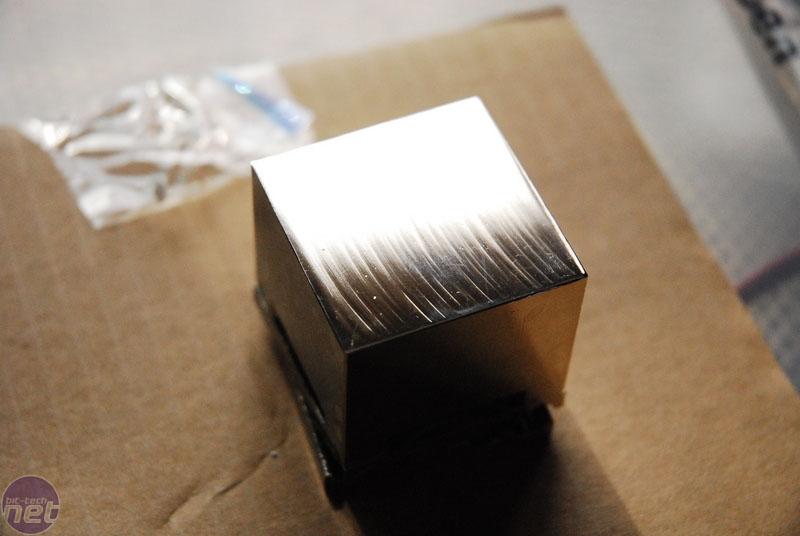

Click to enlarge.
That's right: both blocks are in desperate need of lapping! Astonishingly, no mention is ever made of this in the manual or on the support forums. Proper lapping can easily shave anything between two to three degrees of your temperatures, so especially with passively cooled setups which can run relatively hot, and where heat has to travel through several boundary layers (chip die to block, block to heatpipe clamp, clamp to heatpipe, heatpipe to case wall-mounted clamp, clamp to case wall) a good thermal transfer is vital.
Fitting the blocks
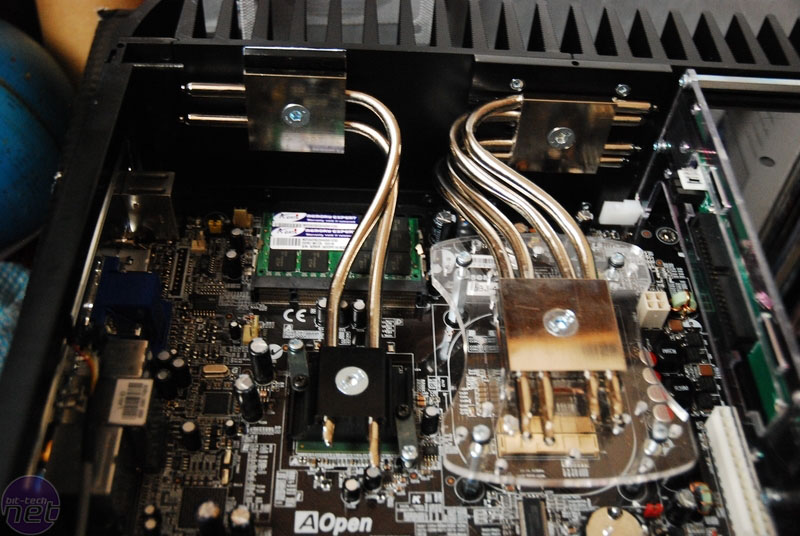
The heatpipe wall plates which will connect to the heatpipes coming from the northbridge and CPU are a straightforward fit. Only one of these is included in the case kit for each block. This is slightly annoying as having another one for the opposing case wall would give a few more useful ways to connect heatpipes to an optional graphics card.When fitting this plate, thermal paste needs to be applied -- more generously than you would with a CPU/heatsink. This is then pressed to the wall with small, circular motions to spread the paste, and then screwed in place with two countersunk M3 screws.

Click to enlarge.
Once the motherboard is fitted (after fitting the blocks to it), it is time to fit the heatpipes. These L-shaped pipes are 6mm diameter nickel-plated brass tubes that can be bent to fit with very little force. I was concerned that this might make the nickel plating crack and flake off, which generally you don't want inside a delicate electronic device, but my fears were totally unfounded.
The bending itself is a delicate process. Too sharp of bends will impair functioning of the heatpipe dramatically. If the wall is pierced, they are useless. They can also easily be damaged by repeatedly bending them back and forth, so fitting them is a process of bend-a-little, fit, bend-a-little, fit again. Once you have bent them in shape, there is no going back: no changing the motherboard (and hence the block positions) or the pipe routing. Plan carefully... Luckily mCubed sells individual pipes so if you ever upgrade your mobo you can simply bend a new set of pipes to fit.
The pipes should lay comfortably in the channels of both the block and the wall plate without needing to press them in place. Once they are the right shape, it is again a matter of generously applying thermal paste in the channels (on both the block/wall plate and the clamping plate), putting the pipes in place and screwing things down.
It is important to keep things tidy and well-planned. Some people have made elaborate arrangements with heatpipe and clamp extensions going all across the case to the opposite walls. Apart from the fact that each extension reduces thermal transfer effectiveness so no actual gains are achieved, it makes for a messy case and should not at all be necessary if they lapped the blocks and planned the build carefully in the first place.
RELATED ARTICLES


MSI MPG Velox 100R Chassis Review
October 14 2021 | 15:04

Want to comment? Please log in.