
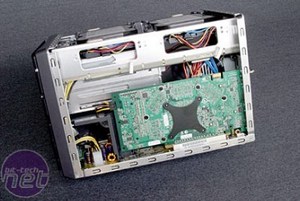
Being a larger than normal Shuttle, you would expect more space inside for assembly, but considering the amount of kit you need to put inside spacious is hardly what I would call the part where most of the build takes place.
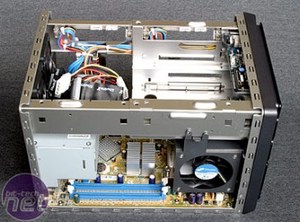
As you can see, most of the parts you will be playing with are at the front of the unit and thanks to the removal cage mentioned earlier access to them is quite simple. The only caveat being the obligation to follow the correct sequence to gain access to the CPU socket and the reverse of it with all the parts to assemble it.
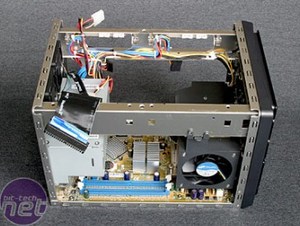
Removing the cage will expose the ICE setup, but before being able to remove the heatsink you will have to remove the plastic shroud covering the capacitors on the board (you can just about see it on the far side).
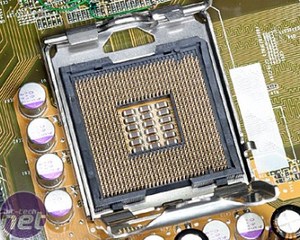
Once removed the ICE you will be left with the nice upturned style pins characteristic of the LGA775 package; the extraction fan swinging nicely out of the way for ease of access.
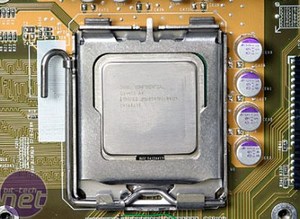
After fitting the CPU and getting some Arctic Silver Ceramique on it I found it quite difficult to fit the heatsink back on. This was mainly because of the heavily tensioned springs and difficult access to two of the fitting screws. For once in my Heatsink fitting career I was happy about the Integrated Heat Spreader on the CPU as there was real risk of a core-crushing moment.
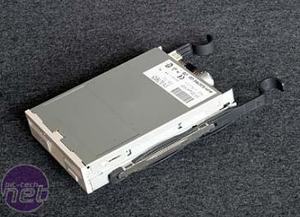
I mentioned previously that Shuttle have praised the SB81P for having a mainly screwless build. Here you can see the plastic rails fitted to the Floppy drive...

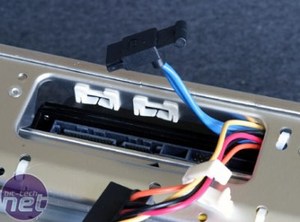
...and there it is safely home in the cage. This space can also be used for a SATA or IDE Hard Drive; the required connectivity also provided.
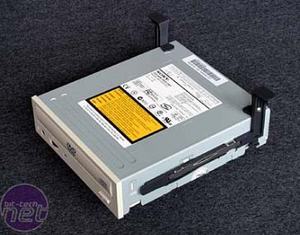
Some odd looking drive rails attached to the DVD-Rom drive there...
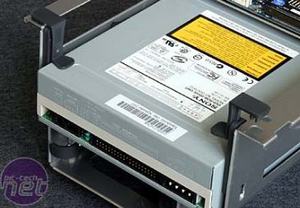
... and securely fitted into the cage. One thing that can be said for the rails is that they are truly designed for multiple use, having changed the drives around (beige to black) I was pleasantly surprised to how easy they are to remove and refit.
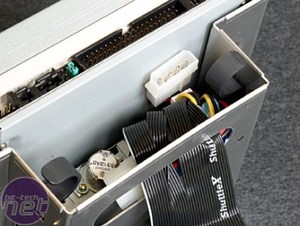
If you do use the floppy slot, I recommend that you fit the supplied power splitter and ribbon cable before you fit the cage back into the system, contrary to what it says in the manual. Trust me; once the cage is fitted you will need the skills of a Keyhole Surgeon to fit them.
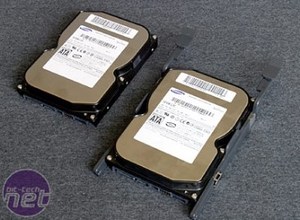
"Where the heck are those going to go?" I hear you ask... Frankly, I asked myself exactly that. Here you see the two SATA drives ready for fitting with the screwless drive retainers fitted on one.
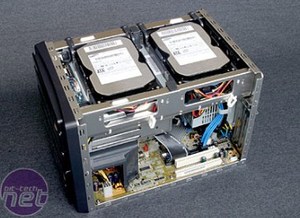
Right there! As you can see, Shuttle have pretty much used every spare square inch of the SB81P's guts, the drives mounted out of the way of the northbridge/onboard graphics cooling air channel, yet solidly fitted to prevent lower MTBF (Mean Time Between Failure).
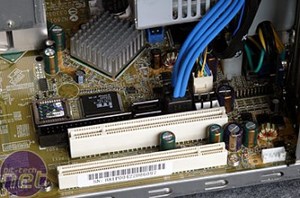
The consideration Shuttle has put into ease of assembly is commendable, you can see here the use of bespoke extended SATA connectors to facilitate hook up. The white split grommets look like they were made for the wires to pass through for extra tidiness but unfortunately as the runs were a little tight I had problems passing the cables through without too much tension on them. I must mention now that this Shuttle is truly SATA oriented, with 4 onboard connectors versus only one IDE ATA100 the opportunity to use your mega fast IDE drives is nil; especially considering you would be sharing the same IDE bus as an optical drive.

Finally it's time for some PCIe goodness; here you can see the nvidia reference 6800GT I will be using for testing. Note the SLI connector on the top; I doubt I would fit two of these beasts into this Shuttle!
As you will be accessing the insides of the unit for most of the assembly, fitting the Graphics card last is essential. The power connector for the NV45 used up the last 4pin Molex onboard so you will have to use a splitter for any other devices (Cold Cathodes, Lazer LEDs, etc).
That's the unit all assembled and ready to rock, you can just about notice the lack of PCIe retaining clip, and considering the weight of the card I would be a bit worried about it working its way loose. This is especially relevant when used as a mobile gaming powerhouse.
But how good is this 7kg beast at delivering high FPS at max detail... let's see.
As you can see, most of the parts you will be playing with are at the front of the unit and thanks to the removal cage mentioned earlier access to them is quite simple. The only caveat being the obligation to follow the correct sequence to gain access to the CPU socket and the reverse of it with all the parts to assemble it.
Removing the cage will expose the ICE setup, but before being able to remove the heatsink you will have to remove the plastic shroud covering the capacitors on the board (you can just about see it on the far side).
Once removed the ICE you will be left with the nice upturned style pins characteristic of the LGA775 package; the extraction fan swinging nicely out of the way for ease of access.
After fitting the CPU and getting some Arctic Silver Ceramique on it I found it quite difficult to fit the heatsink back on. This was mainly because of the heavily tensioned springs and difficult access to two of the fitting screws. For once in my Heatsink fitting career I was happy about the Integrated Heat Spreader on the CPU as there was real risk of a core-crushing moment.
I mentioned previously that Shuttle have praised the SB81P for having a mainly screwless build. Here you can see the plastic rails fitted to the Floppy drive...
...and there it is safely home in the cage. This space can also be used for a SATA or IDE Hard Drive; the required connectivity also provided.
Some odd looking drive rails attached to the DVD-Rom drive there...
... and securely fitted into the cage. One thing that can be said for the rails is that they are truly designed for multiple use, having changed the drives around (beige to black) I was pleasantly surprised to how easy they are to remove and refit.
If you do use the floppy slot, I recommend that you fit the supplied power splitter and ribbon cable before you fit the cage back into the system, contrary to what it says in the manual. Trust me; once the cage is fitted you will need the skills of a Keyhole Surgeon to fit them.
"Where the heck are those going to go?" I hear you ask... Frankly, I asked myself exactly that. Here you see the two SATA drives ready for fitting with the screwless drive retainers fitted on one.
Right there! As you can see, Shuttle have pretty much used every spare square inch of the SB81P's guts, the drives mounted out of the way of the northbridge/onboard graphics cooling air channel, yet solidly fitted to prevent lower MTBF (Mean Time Between Failure).
The consideration Shuttle has put into ease of assembly is commendable, you can see here the use of bespoke extended SATA connectors to facilitate hook up. The white split grommets look like they were made for the wires to pass through for extra tidiness but unfortunately as the runs were a little tight I had problems passing the cables through without too much tension on them. I must mention now that this Shuttle is truly SATA oriented, with 4 onboard connectors versus only one IDE ATA100 the opportunity to use your mega fast IDE drives is nil; especially considering you would be sharing the same IDE bus as an optical drive.
Finally it's time for some PCIe goodness; here you can see the nvidia reference 6800GT I will be using for testing. Note the SLI connector on the top; I doubt I would fit two of these beasts into this Shuttle!
As you will be accessing the insides of the unit for most of the assembly, fitting the Graphics card last is essential. The power connector for the NV45 used up the last 4pin Molex onboard so you will have to use a splitter for any other devices (Cold Cathodes, Lazer LEDs, etc).
That's the unit all assembled and ready to rock, you can just about notice the lack of PCIe retaining clip, and considering the weight of the card I would be a bit worried about it working its way loose. This is especially relevant when used as a mobile gaming powerhouse.
But how good is this 7kg beast at delivering high FPS at max detail... let's see.


MSI MPG Velox 100R Chassis Review
October 14 2021 | 15:04

Want to comment? Please log in.