Thermalright vs Zerotherm: Cooler Faceoff
January 4, 2008 | 08:08
Companies: #test #thermalright #ultra #zerotherm

Installing the Thermalright
What first put me off this heatsink was that it’s quite a ‘mare to install. If you’re using it on an AM2 system then you need to make sure your current motherboard has a metal CPU backplate included otherwise you’ll have to buy one separately for another $3, and if you have an older socket 939 system that’s another $4 instead because the heatsink lacks the support out the box.Only the former is a real criticism though – shipping a $3 part from the States is simply a pain in the arse. If you don’t want to add to the cost, Thermalright, make separate Intel and AMD models available.
The Intel LGA775 support is complete though, but isn't that easy to install – it just takes some serious finger effort to open the extremely stiff cross shaped hold down, and you have to do it it’s in position under the fins, which makes it even more difficult.
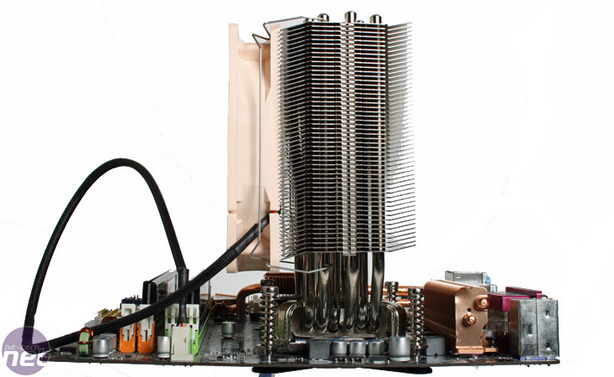
The large sprung screws make sure the maximum contact is made and because there's easily enough space to screw them in, it's actually surprisingly little effort. We'd still screw in the heatsink with the motherboard fully supported on a flat surface underneath, save bending the PCB in anyway.

The heatsink doesn't get in the way of the screws either, unlike some others we've seen before or the Zerotherm below. Once it’s in - it’s solid – that sucker won’t come off unless you take a hammer to it in a caffeine rage, or something.
After this effort, mounting the fan just about tips you over the edge into frustration – firstly the thin, fiddly strips are stuck on to minimise the vibration transfer from fan to heatsink. Next the fan clips are hooked around the ends of the heatpipes and pushed taut into the corners of the fan to keep it there... that is on condition they don’t ping out or you realise you’ve hooked one round the wrong heatpipe. You generally don't get it right on the first attempt. It becomes a “once you’re done, don’t touch it!” so make sure you use the right fan first off.

MSI MPG Velox 100R Chassis Review
October 14 2021 | 15:04


Want to comment? Please log in.