Overclocking the CPU and tweaking the motherboard
Once Vista had been installed, it was time to tweak the system to our heart’s content.However, because we’re using a £45 motherboard, you would expect there to be very little on offer in the overclocking departments of the BIOS – with the Gigabyte GA-P31-DS3L though, we found a whole host of options hidden behind the annoying Ctrl+F1 mask. This was pleasing to see on such a cheap motherboard.
The best thing about the Pentium Dual-Core E2160 processor is that it has a high multiplier and a low front side bus speed, which makes overclocking far easier because the stress is being placed on the CPU and not the motherboard.
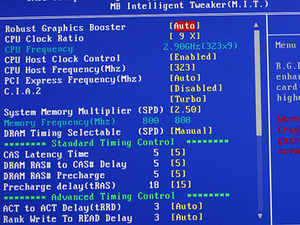
After about several hours of playing around in the BIOS and running stability tests, we managed to get the CPU from its native 200MHz FSB all the way up to 323MHz FSB, while keeping the memory as close to 800MHz at 5-5-5-15. Admittedly, the memory could probably have been tweaked faster with the increased voltage we were putting through it, although we predominantly wanted to have a completely stable and very usable PC so didn't stress it too much.
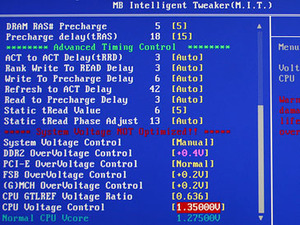
We increased the CPU voltage to 1.35V – enough to give it a kick up the backside, but not so much that the little cooler sweated it out as well. We matched this by an increase of 0.2V FSB voltage and north bridge voltage, as well as a slight tweak to the CPU GTL to keep it happy. Finally we dropped the chipset tRD down to 5 to increase its efficiency just a touch. P35 boards have been known to easily do tRD 4, but without specific control for the north bridge clock it's harder to work with exact finesse.
Unfortunately the board didn't like it when we set it to "Extreme" performance mode – this is Gigabyte's own timing tightening enhancements. This was probably because of the respectively large overclock on a cheaper P31 chipset, so we had to stick to just "Turbo" instead. Regardless of that, reaching 2,908MHz from the original 1,800MHz stock clock speed with nothing more than a puny Intel stock cooler is pretty impressive.
Overclocking the graphics card
Once we'd finished playing around with the CPU and had reached a speed that was stable, it was time to move on and play around with the graphics card. After all, the Palit 9600 GT Sonic not only comes with a fairly substantial dual-slot aftermarket cooler, but it also features more robust power delivery to the G94 GPU.To overclock the Palit graphics card, we used our favourite overclocking utility, RivaTuner, in combination with the three games we used to measure the system’s gaming performance: Crysis, Call of Duty 4 and World in Conflict. We played each of these games for up to an hour—or until the machine crashed—to determine whether or not our overclocking endeavours were successful.

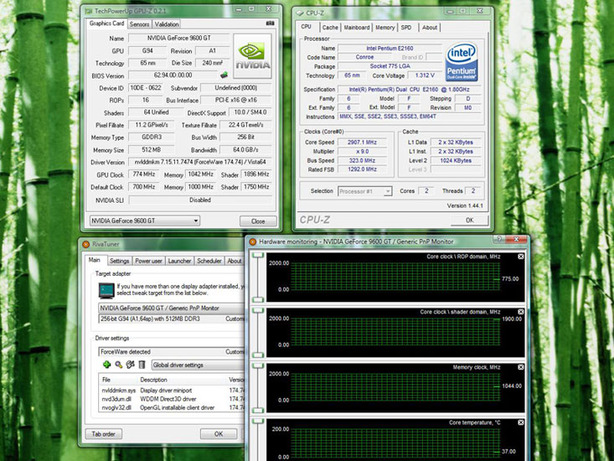
Here we are, all tweaked up...
We started fiddling around with clock speeds with both the shader and core clock linked together, but we quickly found that one of these clock domains didn’t want to overclock quite as far as the other when they were working together. We decided to split the two off and continue overclocking and quickly found that it was the shader clock that didn’t want to hit speeds above about 1,900MHz.
This was a little disappointing in some respects, because past experience has dictated to us that the shader clock is the most important one when it comes to performance. Nevertheless, a 146MHz overclock was nothing to really wince at. We continued to push the core speed up and eventually reached 774MHz before we encountered more problems – this time we started seeing visual artifacting, so it was more than likely the ROPs causing the card not to work at higher speeds than this.
Finally, we tweaked the memory and after about three quarters of an hour, we reached 1,042MHz (2,084MHz effective), which wasn’t all that impressive compared to the frequencies we’d achieved on both the core and shader clock domains.

MSI MPG Velox 100R Chassis Review
October 14 2021 | 15:04


Want to comment? Please log in.