
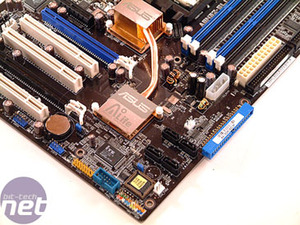
The BIOS chip is located next to the nForce4-powered SATA ports in the bottom left corner of the motherboard. The CMOS reset switch is located by the battery, just below the second PCI-Express x16 slot. If you have two video cards installed in the board, it could be quite a task to reset the CMOS, as it is right underneath the heatsink on most video cards that you're likely to install in this high-end SLI motherboard.
It would have been nicer to see this switch closer to the edge of the board, and - more importantly - obstruction free so that it's possible to reset CMOS without having to remove add-in cards from your system. Alternatively, it would have been good to see the inclusion of a CMOS reset button on the back I/O panel, like Shuttle has been doing with its XPC's for a long while now.
 The front panel connections are located to the left of the BIOS chip, right in the corner of the board. It's good to see that ASUS has taken the time to label them and also colour code them for easy reference and installation. Along the bottom of the board - or the left hand edge in our overview picture - there are headers for the various additional ports that are included in the A8N32-SLI Deluxe's bundle. From bottom to top (in the overview picture), there are headers for: COM1/Serial (turquoise); Game (yellow); two USB2.0 headers supporting four ports (blue) and two IEEE1394 Firewire headers (orange).
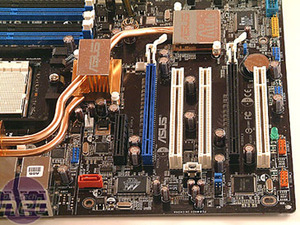
There are two slots between the two PCI-Express x16 slots, which means that there is plenty of room for aftermarket cooling solutions or even GeForce 7800 GTX 512's, if you can find somewhere that will sell you a pair rather than exchange for your kidney's. If you're running two single slot cards, like GeForce 7800 GTX 256MBs or GeForce 7800 GTs, there should be no problem making use of all three PCI slots on the motherboard.
The board comes with the popular Realtek ALC850 8-channel AC97 audio codec - it's a shame to see that ASUS has not implemented a higher-quality audio codec than AC97 into the board. We'd expect a bit more from a high-end motherboard like this. The back I/O panel comes with six universal audio jacks, coaxial S/PDIF out and optical S/PDIF out ports.

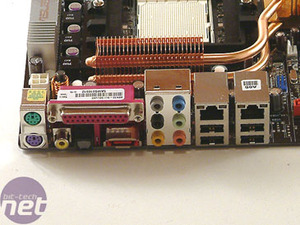 Along with that, there are a wide range of ports, including: PS/2 ports for mouse and keyboard; a 25-pin Parallel port, a single E-SATA port powered by the Silicon Image 3132 disk controller for SATA On-The-Go and four USB 2.0 ports with two Gigabit Ethernet ports directly above them. Curiously, there is no power connector for the E-SATA port, so you'll have to work out your own way to route power to the E-SATA device should it not come with its own mains plug.
The right hand Ethernet port is included in the nForce4 SLI x16 chipset, but powered by the Marvell Gigabit Ethernet PHY. It's kitted out with NVIDIA ActiveArmour, NVIDIA Firewall and NVIDIA Remote Installation Service. The second Gigabit Ethernet port is powered by a PCI-Express based Marvell Gigabit Ethernet controller and requires the installation of additional drivers on top of the nForce SLI x16 stand alone driver.
The JumperFree Configuration sub-menu is where most of the overclocking options are. There is the option to auto-overclock using ASUS' AI Overclocking technology. The AI Overclocking option can be set to Manual, Auto, Standard, AI N.O.S., and Overclock Profile. The latter loads overclocking profiles with optimal parameters for stability when overclocking, while the AI N.O.S. (Non-delay Overclocking System) option is said to intelligently determine the system load and automatically boost the performance when the system is under load.
There are also options for CPU FSB frequency - adjustable from 200-400MHz in 1MHz increments; vCore over voltage, which increases the vCore to +200mV over default; +1.2V & +1.5V over voltage - both increase the voltage by 0.1V; vDIMM (memory voltage) is adjustable from 2.6V to 3.10V in 0.05V increments. When you set FID/VID Change to manual, it's possible to change the CPU multiplier and processor voltage from 1.425v to 1.5625v in 0.0375V increments.
The memory configuration menu also comes with a wide range of timings for the enthusiast to tweak to their heart's content. It's possible to set the memory clock manually to 100, 133, 166, 183, 200, 216, 233 or 250MHz. Setting the MCT Timing Mode to manual allows the adjustment of CAS, tRAS, tRP, tRCD, tRRD, tRC, tRFC and tRWT timings, while setting the MCT Extra Timing Mode to manual enables even more fine tuning for tREF, tWCL, R/W Queue Bypass Count, Bypass Max, Idle Cycle Limit, Dynamic Idle Cycle Centre, DDR Driving Strength, 32-Byte Granularity and DDR Input Strobe skew options. The ASUS A8N32-SLI's BIOS is almost as comprehensive as the likes of DFI's LANParty SLI-DR - it's clear that this board is aimed at the enthusiast looking to tweak to their hearts content.
It would have been nicer to see this switch closer to the edge of the board, and - more importantly - obstruction free so that it's possible to reset CMOS without having to remove add-in cards from your system. Alternatively, it would have been good to see the inclusion of a CMOS reset button on the back I/O panel, like Shuttle has been doing with its XPC's for a long while now.
There are two slots between the two PCI-Express x16 slots, which means that there is plenty of room for aftermarket cooling solutions or even GeForce 7800 GTX 512's, if you can find somewhere that will sell you a pair rather than exchange for your kidney's. If you're running two single slot cards, like GeForce 7800 GTX 256MBs or GeForce 7800 GTs, there should be no problem making use of all three PCI slots on the motherboard.
The board comes with the popular Realtek ALC850 8-channel AC97 audio codec - it's a shame to see that ASUS has not implemented a higher-quality audio codec than AC97 into the board. We'd expect a bit more from a high-end motherboard like this. The back I/O panel comes with six universal audio jacks, coaxial S/PDIF out and optical S/PDIF out ports.
The right hand Ethernet port is included in the nForce4 SLI x16 chipset, but powered by the Marvell Gigabit Ethernet PHY. It's kitted out with NVIDIA ActiveArmour, NVIDIA Firewall and NVIDIA Remote Installation Service. The second Gigabit Ethernet port is powered by a PCI-Express based Marvell Gigabit Ethernet controller and requires the installation of additional drivers on top of the nForce SLI x16 stand alone driver.
BIOS:
ASUS are using an AMI AwardBIOS on the A8N32-SLI Deluxe - it's a little bit different to a conventional Phoenix AwardBIOS, as ASUS lays its BIOS out in a rather unorthodox fashion. Having said that, the BIOS is very easy to navigate once you've got used to the slightly different layout and it has a huge range of tweaking options available to it. Most of the important BIOS controls are located under the Advanced menu option.The JumperFree Configuration sub-menu is where most of the overclocking options are. There is the option to auto-overclock using ASUS' AI Overclocking technology. The AI Overclocking option can be set to Manual, Auto, Standard, AI N.O.S., and Overclock Profile. The latter loads overclocking profiles with optimal parameters for stability when overclocking, while the AI N.O.S. (Non-delay Overclocking System) option is said to intelligently determine the system load and automatically boost the performance when the system is under load.
There are also options for CPU FSB frequency - adjustable from 200-400MHz in 1MHz increments; vCore over voltage, which increases the vCore to +200mV over default; +1.2V & +1.5V over voltage - both increase the voltage by 0.1V; vDIMM (memory voltage) is adjustable from 2.6V to 3.10V in 0.05V increments. When you set FID/VID Change to manual, it's possible to change the CPU multiplier and processor voltage from 1.425v to 1.5625v in 0.0375V increments.
The memory configuration menu also comes with a wide range of timings for the enthusiast to tweak to their heart's content. It's possible to set the memory clock manually to 100, 133, 166, 183, 200, 216, 233 or 250MHz. Setting the MCT Timing Mode to manual allows the adjustment of CAS, tRAS, tRP, tRCD, tRRD, tRC, tRFC and tRWT timings, while setting the MCT Extra Timing Mode to manual enables even more fine tuning for tREF, tWCL, R/W Queue Bypass Count, Bypass Max, Idle Cycle Limit, Dynamic Idle Cycle Centre, DDR Driving Strength, 32-Byte Granularity and DDR Input Strobe skew options. The ASUS A8N32-SLI's BIOS is almost as comprehensive as the likes of DFI's LANParty SLI-DR - it's clear that this board is aimed at the enthusiast looking to tweak to their hearts content.


MSI MPG Velox 100R Chassis Review
October 14 2021 | 15:04

Want to comment? Please log in.