BIOS
The BIOS source for the X48 T2R is very similar to that of the X38 T2R – with that in mind it should have some considerable development under its belt.And it doesn't fail to disappoint.
There is page after page of BIOS options that will either make you wet with glee or turn you off entirely because, after all, not everyone is adept in BIOS-speak. Anyway, let’s get down into the BIOS and have a look at what’s on offer...
Gettin' down with the cool kids... Yo.
The performance options are set into several layers under the Genie BIOS settings: the CPU features, memory timings and voltage settings are under subdirectories here, but in the top level menu there are the standard frequency adjustments and a few other options too.There are the familiar CPU clock ratio, N/2 ratio (half multiplier) and PCI-Express configuration, as well as the DRAM speed settings. This is set between north bridge frequency and memory frequency providing different ratios:
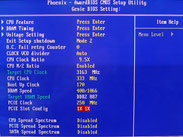
- 200:667 (3:5),
- 200:800 (1:2),
- 266:667 (4:5),
- 266:800 (2:3),
- 333:667 (1:1),
- 333:800 (5:6),
- 333:1066 (5:8),
- 400:800 (1:1)
- and 400:1066 (3:4).
 The trick is to keep the left frequency as low as possible, but the right frequency up – this allows a very low chipset (tRD) timing and a higher memory frequency, but it does limit overclocking if you're in need of some serious FSB overhead.
DFI says that the 1:1 ratio for 333:667 is set to run tighter tRFC timings by default compared to the 400:800 setting, but that doesn't prevent you from optimising it yourself. These memory settings allow for some particularly fast memory speeds from the 1,066 options and thankfully as you play it lists the actual memory speed underneath, which keeps the system intuitive.
The Boot Up Clock option is useful for the system to revert to a safe clock when overclocking fails – this is featured on other boards as well but never with a specific frequency like DFI offers here.
Playing with Memories and Performance Levels
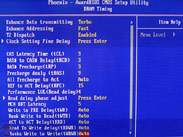 Under the DRAM timing subsection things get a bit more serious. Unfortunately, DFI hasn't separated the primary and advanced (and further advanced...) options, instead opting for just a long list of everything. While they are labelled clearly, it doesn't help usability. The one setting we noticed that was a little strange was the tWR setting; usually, we set this to 4/5/6 (4 for performance, 6 for stability), but this time you need to set 10 for performance and 12 or 13 for stability. Command Rate is also hidden behind T2 Dispatch where enabled sets 1T and disabled sets 2T.
The Enhance Data Transmitting and Enhance Addressing options are DFI's general fine-tuning performance enhancements. They can be left to auto, or try and set it to Fast or Turbo for a more performance – we used Turbo for benchmarking the E8500. We tried playing with these settings and found they were quite sensitive to FSB adjustments; while it worked at the fastest setting for a 1,333MHz Core 2 Duo, it wasn't happy moving away from Auto with a Core 2 Extreme QX9770 at 1,600MHz FSB.
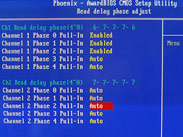 Below there are the more familiar memory performance timings (CAS latency, tRCD, tRP, etc), but the performance can also be tweaked through tRD – and this is where it gets a bit confusing. The Performance LVL (level) Read Delay option is the "general" tRD timing, but it's in combination with the Read Delay Phase Adjust sub-sub menu that fine-adjusts the active phase shift registers of that specific memory divider.
 By enabling the phase adjusts, this decreases the tRD value to give a true value of one below the general setting: i.e. if you set the tRD to 7 and enable the phase adjusts, the true tRD will be 6. As usual, when they are left at Auto, the BIOS will do what it thinks is best depending on the memory divider and FSB level. However, this can sometimes conflict with the general tRD setting if that's not also set at Auto.
The MCH ODT (On Die Termination) Latency can be used to tweak the timing of the ODT command – this can help when you're running higher memory timings which require a lower latency or four DIMMs filling all the slots, as it protects the DATA signal integrity.
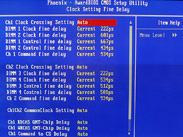 Next up, the Clock Setting Fine Delay sub-sub menu here offers the options of Aggressive to Relaxed. DFI explains it as;
“...after the CPU, PCI-Express and DRAM are locked to the clock phase by the “PLL (phase locked loop)”, we can utilise the DRAM DLL (delay lock loop) to adjust the DRAM operating phase by tuning the DRAM DATA output phase forward or backward, to create a better match with current DATA operating phase. The BIOS will automatically calculate a parameter after system boot up and it will also show the current value of this parameter. The best tuning range for finding the best DATA operating phase will be 3 adjustments before or after the current value.”
GTLs, VTTs and a bag of ice for my head, please...
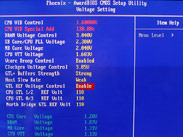
In addition to this there are other cool little tweaks like the Clock Gen Voltage, Host Slew Rate (voltage drive strength for the north bridge), GTL+ buffer strength (voltage reference drive strength for the north bridge), as well as fine grain adjustments for CPU and Northbridge GTL reference voltages. The GTL (Gunning Transistor Logic) reference settings are useful because they determine the difference between 0 and 1 (high and low voltage) – as voltages and bus speeds are increased the noise and notable difference between high and low states becomes harder for the chipset to determine.By adjusting the GTL, you can fine tune the stability and maximise signal margin and integrity. At default, the reference voltage is 67 percent of VTT, but increasing the VTT voltage it also increases the GTL with it (hence being a percentage of), but if you're really throwing it at a wall playing with small changes above and below this factor can help.

DFI lists them as mere numerical values rather than voltages that change according to VTT, and this makes the correlation between them quite complicated as shown in the table above. However, for some finesse you'll need to make an Excel spreadsheet with fine controls detailing your chosen VTT value and how it correlates to a GTL voltage, and then a BIOS numerical value. If DFI worked in simple percentages or even relative voltages to calculate the GTLs this would be far, far more user friendly in our opinion.
While VTT is useful for hitting higher FSB values, 45nm CPUs are more sensitive to it; in the manner in which they'll keel over and die. So while playing with the VTT and GTL values maybe fun remember the poor thing sweating it out under that big heatsink and keep the VTT below 1.3V and certainly no higher than 1.35V.
Normality Restored
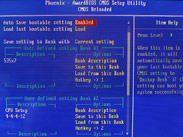
OK, let’s take a step back to normality now because I'm sure if you're like me, your eyes are rolling in their sockets and you're starting to dribble.DFI also includes its BIOS Reloaded function for saving BIOS settings (especially useful on DFI boards!) and also an "EZ Clear CMOS". To use this, hold down the power and reset buttons for 5 seconds, then hold down the Insert key to do a complete clear CMOS and power on the system, or hold down the Home key to just erase the FSB value while keeping the rest of the settings intact. That's pretty damn nifty if you actually use a case and don't rely on leaving everything strewn over a desk like we do.
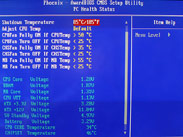 What DFI is missing though is an in-BIOS update utility like the ones that Asus and Gigabyte include. These work far more reliably than in-Windows BIOS Flash software and can usually see USB keys rather than needing a floppy. At the moment DFI limits you to the old floppy and DOS method (and how many of you still own a floppy drive these days?) or the Windows method which can be about as safe as dipping your man-bits into a rattlesnake's nest.
All in all we have to say, if you've used DFI boards before and know the ins and outs of a BIOS you'll still enjoy learning something new. If you're a bit greener and lack patience, look elsewhere. Seriously, no matter how much you might think you want to join the DFI fanboy club and proclaim your expertise, you will just get annoyed with yourself... and more importantly the board instead. Of course, you can leave everything default/Auto and play with just a few settings you know – that's perfectly fine, but you won't get the best out of the board unless you invest in some time reading around and playing with settings until your fingertips bleed.

MSI MPG Velox 100R Chassis Review
October 14 2021 | 15:04


Want to comment? Please log in.