The Build
While many people who troop into the Apple store are attracted by the convenience of the iMac, you wouldn’t be reading a site like bit-tech if you thought that building a PC was a chore. Opening a big box full of a perfect mix of components ready to be assembled is a great moment.We began our build by gutting the inside of our SilverStone LC13 chassis and removing the front panel connectors, drive bays and stock fans. This was especially important in this build, as we wanted to water-cool the system, which meant that a visit to the chop-shop would be necessary.
Unfortunately, the bit-tech offices don’t have a fully outfitted chop-shop, so we had to make do with the podcasting studio. Taking a Dremel to a beautifully crafted, brand-new case can be a nerve-wracking experience, but with some patience and double-checking, you’ll be ready to go. Before we started slicing, we experimented with laying out the water-cooling system inside the case. We knew that the reservoir would be housed in the lower 5.25in drive bay, and the radiator and its single 120mm fan would be located on the side of the case.
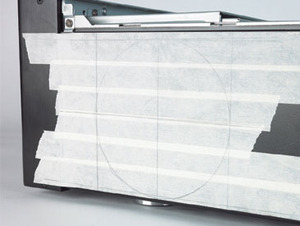
It was clear that we wouldn’t be able to fit the radiator near the CPU, so it had to go on the other side of the case, near the PSU. Once we’d found an ideal location for the radiator, we covered the outside of the case with masking tape, which provides an ideal surface for noting measurements, as well as limiting splinters and metal dust. Dremel’s heavy-duty cut-off blade is great for cutting steel and we needed around three of these to complete the job.
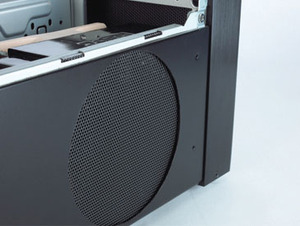
Make sure you wear protective gloves and goggles when undertaking this kind of work: steel dust is a nasty thing to get on your skin or in your eyes. Once the hole was cut, we filed the edges to make them smooth, and then fitted a perforated metal cover. The material we used to cover the blowhole is available at most good DIY stores for a few pounds, and is usually bought in 1/2m squares, although we had some in the CPC lab. To secure it to the side of the case, we used industrial-strength double-sided adhesive foam tape. It’s available to buy from the holy land of PC building, Maplin.
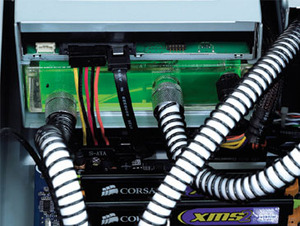
We then installed the CPU, memory and a basic HSF in the motherboard on the workbench and quickly tested it to check that it all worked. With this test passed, we then fitted the waterblock to the CPU, and began work on the loop. Installation wasn’t too tricky, thanks to the fact that we used only one block, and a combined reservoir and pump, along with compression fittings. We then filled and leak-tested the loop, and installed it in the case. To secure the radiator and fan to the side of the case, we used more double-sided adhesive foam tape, but secured the radiator to the bottom of the case, rather than the side.
With the loop installed and leak-tested, we could start adding in the other hardware and managing the cables. The internal 3.5in bays made an ideal space to tuck away both the power cable from the graphics card and the excess tubing that we had to route around the graphics card in order to attach the lid of the chassis. The base of the LC13 is also the motherboard tray. As the spacer bolts are screwed into raised bumps on the bottom of the case, there’s a good-sized gap under the motherboard. This space can be used to route cables unobtrusively to their respective connectors, which is handy, as there isn’t a great deal of space to work with once you start adding components.
A general tip when cabling a PC such as this is to make sure you don’t cross over the cables, as this would result in them being double-decked and unable to fit under the motherboard. If this happens, the solder points under the PCB can push through the insulation of the cable and come into contact with the metal. This can potentially result in small explosions, dead motherboards, the opening of interdimensional gateways and other unpleasant experiences. After we had tidied away the final cables, we were left with a suitably attractive PC with which to commence battle against the iMac.

MSI MPG Velox 100R Chassis Review
October 14 2021 | 15:04


Want to comment? Please log in.