
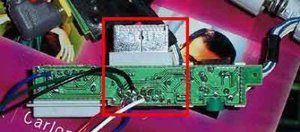
There are three harnesses attached to the lower circuit board, you need two of them, the one that connects to the power header (2 wires) and the one with twelve wires located in the middle, you can desolder/cut off whatever you want with the ten pin harness, it wont be needed.The suggestion I have (if you have a heatgun) is to remove the middle connector from the circuit board This makes it easier to solder your wires without shorting anything out. It's an awfully small area to work with if you don't have a professional soldering iron.
In the pictures below, borrowed from Starfox's site, you can see the area in red where we will be working, and the connector that you can remove if you wish.
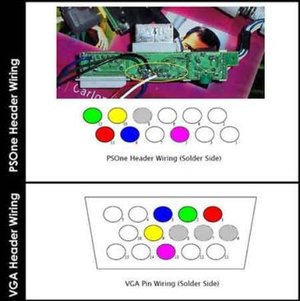
The pinout is as follows:
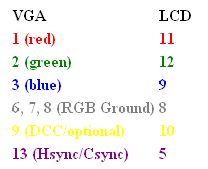
Looking at the back of the circuit, (you can use the image below to guide you) I'm not 100% sure what the DCC line is for, I'm not using it because the cable I used did not have this pin on it but FYI, it is 5v. I have been told since originally publishing of this article that this pin is for powering up the display with a control signal...I'm also told that this only applies to LCD's which use the PAL frequencies.
Now we get to stick it all together, I used double sided sticky tape to attach the LCD to the circuit so it didn't move around. First plug in the CCFL line, as it's the longest, and then you can manoeuvre the ribbon cable back through its hole and into its slot, and firmly press down on the controller and the brown retainer to attach the tape to the LCD and securely clamp down on the ribbon cable (be careful here, too, as pressing too hard can break your LCD).
Remember the adapter you received with the display? This is where it comes in. Route its cable through your case to wherever your going to mount it, and plug it into it's connector, then the VGA cable. If you wish, you can build yourself a 7.5V DC Regulator to control the LCD from 12v, there are other ways you can try to power this display through your 12v line, but because my circuit-designing skills are limited, this tutorial will not cover the making of these devices. You can talk in the forums with other readers to figure this out if needed, but for now we will just use the supplied adapter.
Now you should have the CCFL plugged in, the LCD plugged into the controller, and the lower circuit connected back to the display, along with the 7.5volt from the adapter.
To get this display to work off the bat, I had to plug in another monitor to its port until I logged into windows, and then I plugged in the display. This problem was quickly resolved by using a video card that supports C-Sync. Most ATI cards will support this, but few NVidia cards do. You will have to check the technical specification of your video card to find out. Alternativly you can use an old Matrox Mystique card. It supports the functionality of C-Sync.
Now, you thought THAT was hard? Hah! You now have a few hours of tinkering to do. You have to download PowerStrip here and install it. Power Strip will allow you to adjust the timings on your display output to allow it to properly tune the frequencies that the LCD uses to display its images.
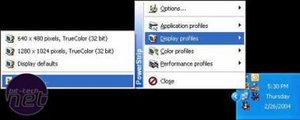
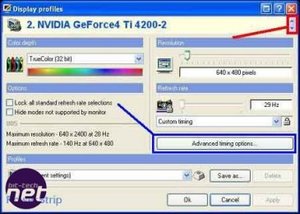
Next thing you want to do is load it up, right click the icon in the task manager, go to 'Display Profiles', and click 'configure'.
Use the down arrows squared in red to highlight the LCD's interface and click 'Advanced Timing Options' highlighted in blue.
Next, click custom resolution, highlighted in red, and select the "640x480i (Arcade)" resolution at the very bottom. Match your clocks to roughly those shown below. Remember that each LCD display is going to have slightly different timings. No display will work using the exact same frequencies as another. I cannot count the numerous e-mails I have received concerning the timings and how mine do not work on theirs. Of course not. Fool around a bit and you'll get it sooner or later. This is where your patience comes in, it took me many hours to get the display the way I like it. So as a starting guide adjust your settings to the timings I have provided below, and play around from there.
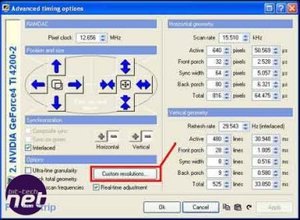
Problems you may face:Some people complain about 1cm screen drops. This is caused by connecting the screen to a card without Csync. Other problems are mouse pointers being 2 inches lower on the screen from where your actually clicking. This is caused by the screen being deInterlaced. To solve this problem check the Interlaced checkbox.Note: You will probably have to readjust your timings if you don't have interlaced selected.

If you have any problems that aren't resolved here, then you can post on the forum thread by clicking here
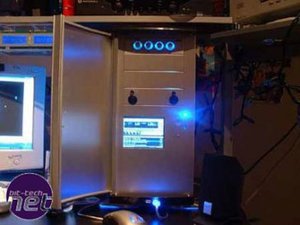
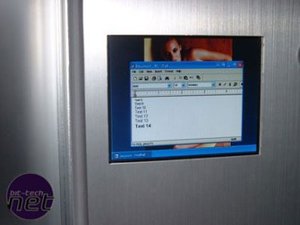
Now, for some eye-candy:
In the pictures below, borrowed from Starfox's site, you can see the area in red where we will be working, and the connector that you can remove if you wish.
The pinout is as follows:
Looking at the back of the circuit, (you can use the image below to guide you) I'm not 100% sure what the DCC line is for, I'm not using it because the cable I used did not have this pin on it but FYI, it is 5v. I have been told since originally publishing of this article that this pin is for powering up the display with a control signal...I'm also told that this only applies to LCD's which use the PAL frequencies.
Now we get to stick it all together, I used double sided sticky tape to attach the LCD to the circuit so it didn't move around. First plug in the CCFL line, as it's the longest, and then you can manoeuvre the ribbon cable back through its hole and into its slot, and firmly press down on the controller and the brown retainer to attach the tape to the LCD and securely clamp down on the ribbon cable (be careful here, too, as pressing too hard can break your LCD).
Remember the adapter you received with the display? This is where it comes in. Route its cable through your case to wherever your going to mount it, and plug it into it's connector, then the VGA cable. If you wish, you can build yourself a 7.5V DC Regulator to control the LCD from 12v, there are other ways you can try to power this display through your 12v line, but because my circuit-designing skills are limited, this tutorial will not cover the making of these devices. You can talk in the forums with other readers to figure this out if needed, but for now we will just use the supplied adapter.
Now you should have the CCFL plugged in, the LCD plugged into the controller, and the lower circuit connected back to the display, along with the 7.5volt from the adapter.
To get this display to work off the bat, I had to plug in another monitor to its port until I logged into windows, and then I plugged in the display. This problem was quickly resolved by using a video card that supports C-Sync. Most ATI cards will support this, but few NVidia cards do. You will have to check the technical specification of your video card to find out. Alternativly you can use an old Matrox Mystique card. It supports the functionality of C-Sync.
Now, you thought THAT was hard? Hah! You now have a few hours of tinkering to do. You have to download PowerStrip here and install it. Power Strip will allow you to adjust the timings on your display output to allow it to properly tune the frequencies that the LCD uses to display its images.
Next thing you want to do is load it up, right click the icon in the task manager, go to 'Display Profiles', and click 'configure'.
Use the down arrows squared in red to highlight the LCD's interface and click 'Advanced Timing Options' highlighted in blue.
Next, click custom resolution, highlighted in red, and select the "640x480i (Arcade)" resolution at the very bottom. Match your clocks to roughly those shown below. Remember that each LCD display is going to have slightly different timings. No display will work using the exact same frequencies as another. I cannot count the numerous e-mails I have received concerning the timings and how mine do not work on theirs. Of course not. Fool around a bit and you'll get it sooner or later. This is where your patience comes in, it took me many hours to get the display the way I like it. So as a starting guide adjust your settings to the timings I have provided below, and play around from there.
Problems you may face:Some people complain about 1cm screen drops. This is caused by connecting the screen to a card without Csync. Other problems are mouse pointers being 2 inches lower on the screen from where your actually clicking. This is caused by the screen being deInterlaced. To solve this problem check the Interlaced checkbox.Note: You will probably have to readjust your timings if you don't have interlaced selected.
If you have any problems that aren't resolved here, then you can post on the forum thread by clicking here
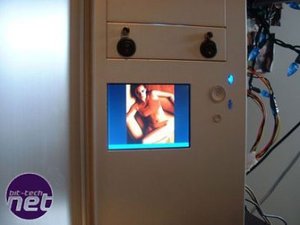
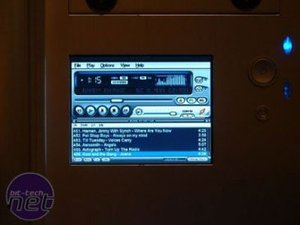
Now, for some eye-candy:
RELATED ARTICLES


MSI MPG Velox 100R Chassis Review
October 14 2021 | 15:04

Want to comment? Please log in.