How to Overclock an Nvidia GeForce Graphics Card
The first thing to do when overclocking a graphics card is to gauge the current performance of your card. You can do this by FRAPSing a section of a game or running a synthetic test, but you need to see what effects (if any) your overclocking is having on your PC’s performance.If you chose the real-world test remember that you’ll want a test that’s not limited by the speed of your CPU, that’s consistent from one run to the next and that’s repeatable. You’ll therefore need a game that’s graphically demanding, and to find a section of that game that doesn’t differ from one play-through to the next. This can be tricky, so a synthetic test might be better.
Synthetic tests have the benefit of being absolutely consistent from one run to the next, and they require very little setup time. A real-world test can require hours of double-checking numbers, finding and eliminating inconsistencies and general frustration. However, synthetic tests are just that, and while a 3DMark score of 14,000 rather than 12,000 might sound great, it doesn’t tell you whether your PC can now play Crysis and Very High detail.
Make your own decision on which method to use, based on what you want to achieve. For example, if you’re trying to get Bad Company 2 to play smoothly, it’s probably best to try to develop your own real-world benchmark for this game. Good examples of synthetic tests are 3DMark Vantage and Unigine Heaven, while many games have built-in benchmarks to give a semi-real-world test.
Get Overclocking!
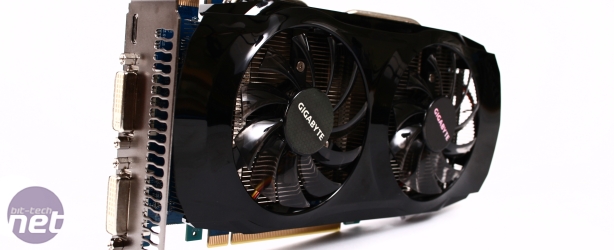
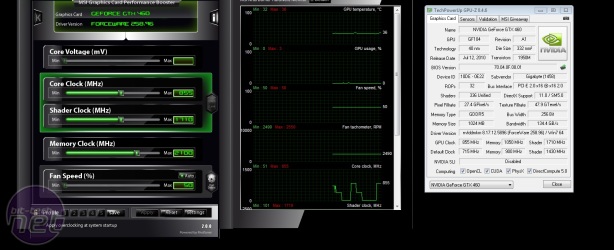
Once you have your baseline performance, you’ll need an application to overclock your GPU. Most Nvidia partners have their own custom applications, but most applications work with most cards, so you could as easily use Zotac’s Firestorm, MSI’s Afterburner or another favourite. Unfortunately it seems that Gigabyte doesn’t have a version of OC Guru to use with Nvidia cards as it does with its ATI alternatives. GPU-Z is an excellent way to determine whether your overclocking application has actually overclocked your card, as you can also see below.Your overclocking application will present three crucial sliders - Core, Shaders and Memory – plus manual fan control. Some applications have more options, but these are the important ones for overclocking. The Shaders (usually called stream processors) usually run at twice the speed of the Core. For example, we’ve used MSI’s Afterburner to overclock our Gigabyte GTX 460 OC 1GB and we had to drag the Core slider to 855MHz and the Shader slider to 1,710MHz.
We found that this was the limit of the card by steadily increasing the GPU’s frequency in increments of 50MHz and then 10MHz from the 715MHz core and 1,430MHz stream processor clocks that it ships with. After we applied each overclock, we ran our benchmark test a few times to see whether the card would overheat at its new speed and whether the overclock added any extra performance. By reading our overclocking efforts in our reviews, you should be able to take a short-cut and start overclocking near to the limit of your card, or the final overclock that you wish to achieve.
We next increased the memory speed of the card, again by sliding the bar upward in 50MHz and then 10MHz increments. We settled on a final speed of 2,100MHz. This is actually a mis-report from Afterburner, as it’s forgotten that the GTX 460 uses GDDR5, which is quad-pumped, rather than GDDR4, which is dual-pumped. The actual effective speed of our overclocked memory was 4.2GHz.
As you can see from the graph, our overclock added a massive 13-14fps of extra performance for just an hour of patience. In fact, our overclock was so good that our card out-performed a stock-speed GeForce GTX 470, which costs £50 more!
Overclocking Cheat List
Can’t be bothered to read all those words? Allow us to be of service:- Determine your current performance Run a test to determine how fast your PC is before overclocking.
- Get a benchmark Whether synthetic or real-world, get a benchmark that allows you to stress your overclock and give you an idea of how much speed you’re adding. You can use FRAPS and play a section of a game, use an in-game benchmark or download a synthetic test such as 3DMark Vantage or Unigine Heaven.
- Get your overclocking toolkit Download an overclocking application and GPU-Z to verify that it’s working.
- Raise the frequencies gradually, testing as you go The stream processors of an Nvidia card should be double the core speed, while you should be able to add 100-200MHz to the memory speed. Remember that after applying every overclock you need to run your chosen benchmark a few times to check that it’s stable, and that it’s actually increasing the performance of your PC.
- Bragging Once you’re done, and you’ve added 20 per cent more speed for free, you can officially boast your l33t skills to your friends and family. But don’t go on about it too much, or you’ll become Tech Support Guy/Girl for the rest of your life.

MSI MPG Velox 100R Chassis Review
October 14 2021 | 15:04


Want to comment? Please log in.